


For as long as I’ve known PC’s, installing an Operating System required an installation disk, usually a DVD or maybe a CD for the older Windows XP or early versions of Ubuntu. But all that changed when DVD drives started going the way of the floppy disk. Modern notebooks no longer come with this once very popular drive. The way to go is USB. The only sure way to install an operating system on a PC today is to use a bootable USB drive. There are tons of tools that will help you create these; here are our top picks.
Rufus
Now, let’s create our first bootable UFD using Rufus, shall we? Follow these steps:
- an account with admin access in order to make the to hardware. After authenticating, insert the USB flash launch Rufus. It will detect the drive almost immediately. Since Rufus can handle various partition schemes and file structures, the correct settings are set that match the UFD you’re going (Figure A).
Figure A
- optical drive button next to the Create a bootable disk , and you’ll be prompted to search for the ISO image to use (Figure B).
Figure B
- ISO images, Rufus will automatically modify the settings to it. Once everything is set correctly, click the Start button the process. You’ll be prompted with a warning that all data UFD will be destroyed. Click OK to proceed with the creation process (Figure C).
Figure C
- the ISO image size, the process may take several minutes . For the log readout of each step in the process, click the to open a side window and save the output details (Figure D).
Figure D
- part of the entire process is the file copy portion. This the last step and varies depending on file size/number to copy (Figure E).
Figure E - When complete, double-check the external drive to verify the files were copied over (Figure F).
Figure F
With the process completed, simply eject the UFD, insert it into the device you wish to install the OS on, and boot as you normally would. The days of carrying multiple CD/DVDs with you and dealing with lagging installs are drawing to a close with the ubiquitous use of USB drives—and the storage capacity can’t be beat.
PowerISO
PowerISO is another very versatile tool on Windows that allows you to mount .iso files onto virtual drives and create bootable USB disks. To create bootable USB, follow these steps;
- Start PowerISO (v6.5 or newer version, download here).
- Insert the USB drive you intend to boot from.
- Choose the menu “Tools > Create Bootable USB Drive”. The “Create Bootable USB Drive” dialog will popup. If you are using Windows Vista or above operating system, you need to confirm the UAC dialog to continue.
- In “Create Bootable USB Drive” dialog, click “…” button to open the iso file of Windows operating system.
- Select the correct USB drive from the “Destination USB Drive” list if multiple USB drives are connected to the computer.
- Choose the proper writing method. “USB-HDD” is recommended.
- Click “Start” button to start creating the bootable USB drive.
- PowerISO will alert you that all data on the USB drive will be destroyed. Click “OK” to continue
- program will start writing USB drive, and showing the progress information. You should get the message “Writing USB drive completed successfully.” after the operation completes.
If no errors occurred in the above process, you should now be all set to setup Windows from USB drive!
UNetbootin
The following assumes your working from within Windows and have a current copy of the ISO you wish to convert.
- Download UNetBootin for Windows
- Download your favorite Linux ISO
- Double click the Unetbootin Executable to start the program
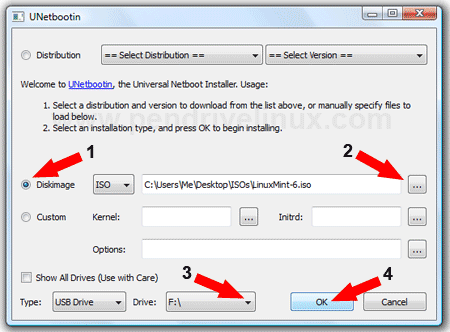
- (1) Click the Diskimage radio box (2) browse to select your ISO (3) Set your target USB drive (4) click OK to start the creation.

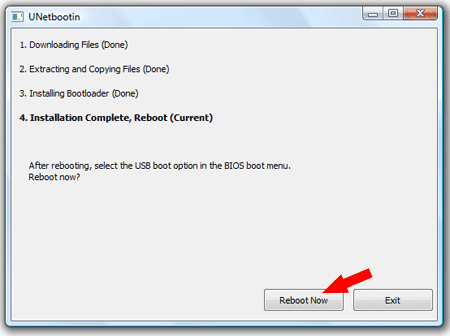
- Once the UNetbootin installer has completed, click Reboot Now

- Set your system BIOS or boot menu to boot from the USB device and enjoy your favorite Live Linux on USB
Etcher
The usage is quite straightforward (as shown in the image):

- Select an image: to burn onto the drive. There are many supported formats including iso, img, zip and gzip.
- Select a drive: that you wish to use as a bootable medium. Remember this drive will be completely erased.
- Flash!: press this button to start flashing the drive, once the process is complete you can eject the drive and use it.
Windows 7 USB download tool
To install the Windows USB/DVD Download Tool:
1. Click to open the Windows USB/DVD Download Tool page.
2. Click Download then Run.
3. Follow the steps in the setup dialogs. You’ll have the option to specify where to install the Windows USB/DVD Download Tool.
You must be an administrator on on which you are installing the Windows USB/DVD Download tool. It requires the Microsoft .NET Framework version 2.0 .
System requirements
- Windows XP SP2, Windows Vista, or Windows 7 (32-bit or 64-bit)
- Pentium 233-megahertz (MHz) processor or faster (300MHz is recommended)
- 50MB of free space on your hard drive
- DVD-R drive or 4GB removable USB drive
For Windows XP users
The following applications must be installed prior to installing the tool:
- Microsoft .NET Framework 2.0 must be installed. It can be downloaded here.
- Microsoft Image Mastering API v2 must be installed. It can be downloaded here.
Using the Windows USB/DVD Download Tool
Before you run the Download Tool, you have purchased the Windows ISO download from Microsoft Windows ISO file to your drive. have purchased Windows but have not yet ISO file, you can download the ISO file from your Microsoft Store Account.
To make a copy of your Windows ISO file:
1. Click the Windows START button, and click WINDOWS USB/DVD DOWNLOAD TOOL in the ALL PROGRAMS list to open the Windows USB/DVD Download Tool.
2. In the SOURCE FILE box, type the name and path of your Windows ISO file, or click BROWSE and select the file from the OPEN dialog box. Click NEXT.
3. Select USB DEVICE to create a copy on a USB flash drive or select DVD disk to create a copy on a DVD disk.
4. If you are copying the file to a USB flash drive, select your USB device in the drop-down list and click BEGIN COPYING. If you are copying the file up to a DVD, click BEGIN BURNING.
When your Windows ISO file is copied to your drive, install Windows by moving to the root folder of your DVD or USB drive, and then double-click Setup.exe.
Rufus, etcher, UNetbootin, Universal USB Installer or Windows 7 USB download tool