


Watching movies is a great way to relax and enjoy some quality entertainment. However, sometimes it can be difficult to understand everything that is being said, especially if the movie is in a language that you’re not fluent in. That’s where subtitles come in. In this article, we shall see how to add subtitles permanently to a movie in VLC and also get to learn the different types of subtitles as well as a few tips.
Subtitles can make it easier to follow along with the dialogue and can also be helpful for those who are hard of hearing. In this article, we’ll show you how to add subtitles to a movie using VLC Media, a free media player that’s available for Windows, Mac, and Linux.
Finding Subtitles for Your Movie
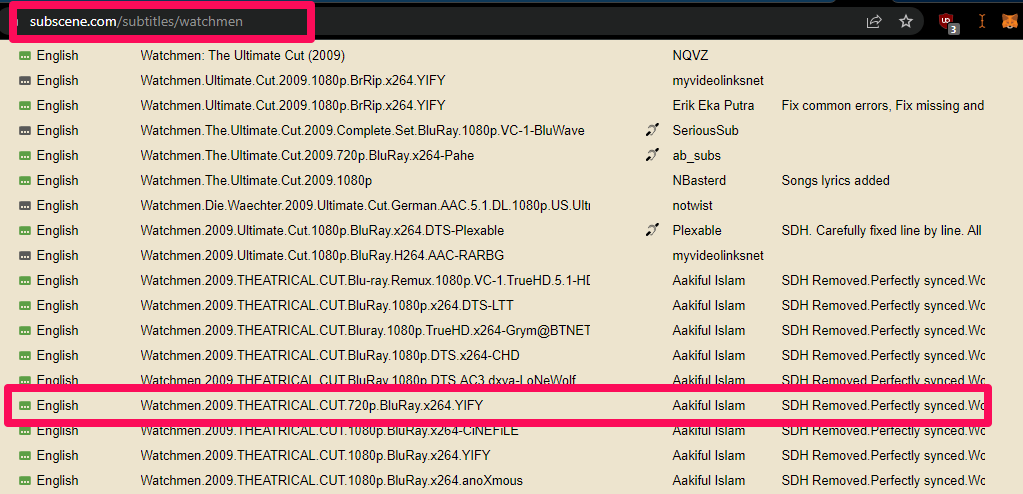
The first step in adding subtitles to your movie is to find the right subtitle file. Subtitles come in different file formats, such as SRT, SUB, and ASS. The most common format is SRT, which stands for SubRip Text. You can find subtitles for your movie online at websites like Open Subtitles, Subscene, and Yify Subtitles. Be sure to download the subtitle file that matches the language, format, and specifics of your movie.
Related: How to Convert MP4 Video to MP3 Audio Using VLC
Adding Subtitles to Your Movie
Once you’ve downloaded the subtitle file, you can add it to your movie in VLC Media. For example, I will use the Watchmen (The Ultimate Cut) to show you how to add them: Here are the steps:
- Open VLC Media to start playing your movie.
- Head over to one of the above sites to download the subtitles.

- After downloading the file, if it is a zip, unzip it first.
- Now to VLC, click on “Subtitle” in the menu bar and select “Add Subtitle File.”

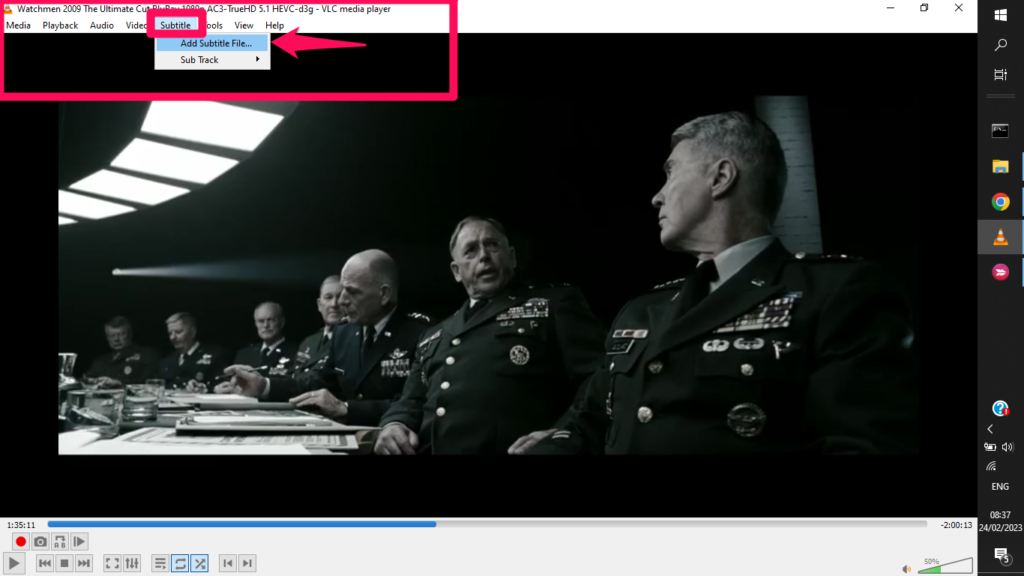
- Navigate to the folder where you saved the subtitle file and select it.
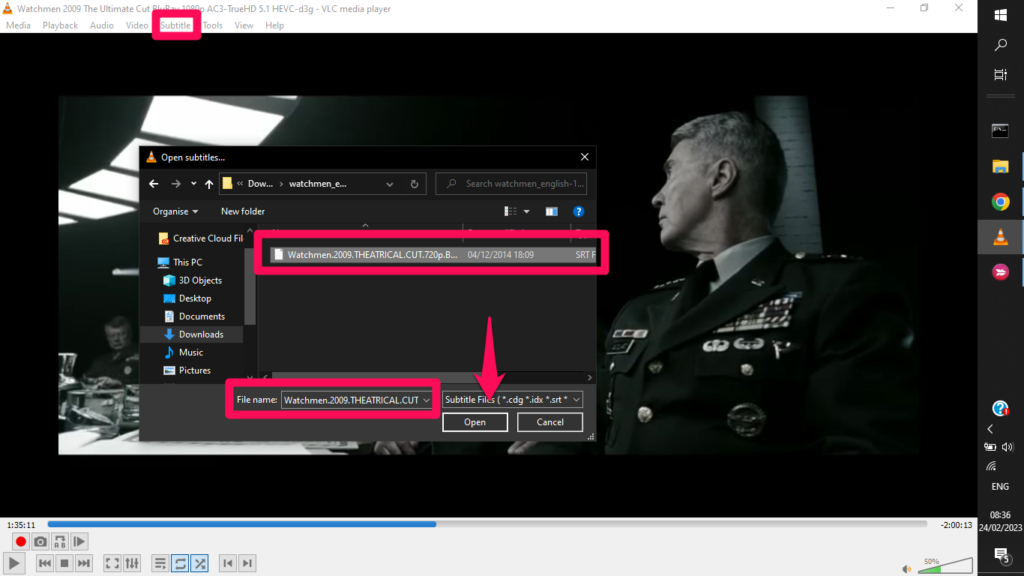
- Click on “Open” to add the subtitle file to your movie.
- A pop will show showing that the “sub-track has been added“.
Related: Top 7 features that will make you use VLC like a Pro
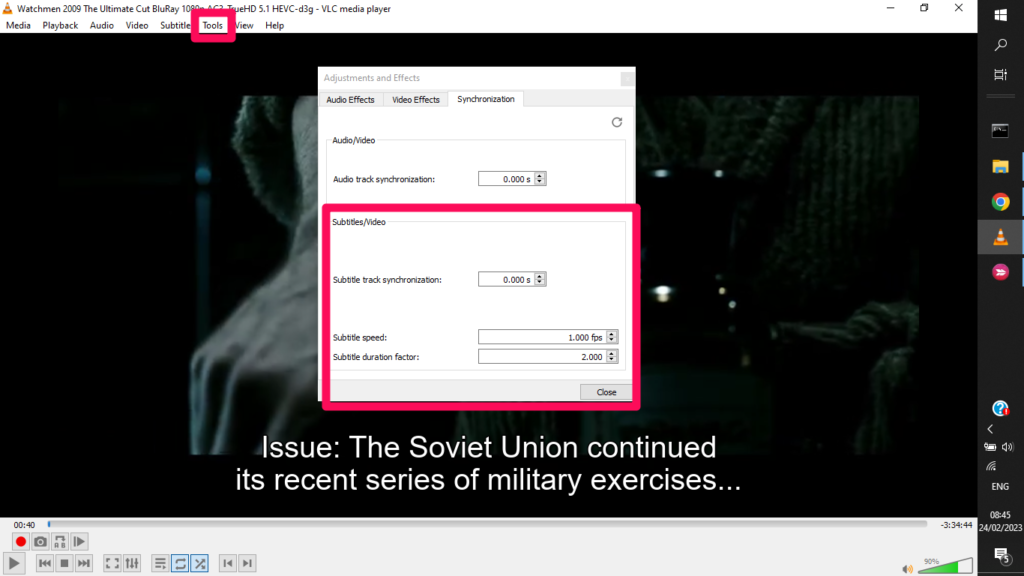
If the subtitle file doesn’t sync up with the movie, you can adjust the subtitle timing by clicking on “Tools” in the menu bar and selecting “Track Synchronization”.
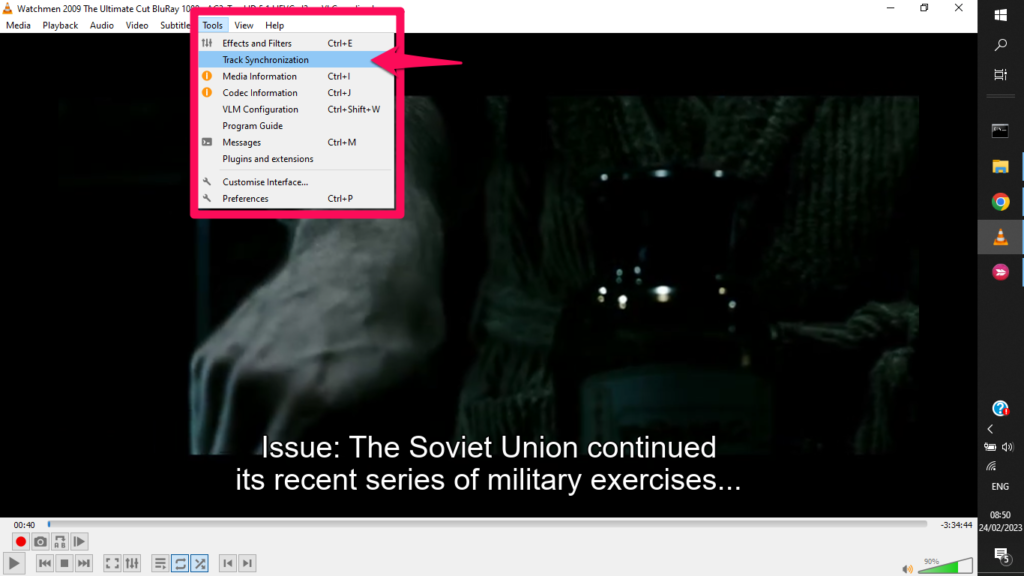
From there, you can adjust the subtitle timing by selecting the “Synchronization” tab and adjusting the time offset.
Adjusting Subtitle Settings
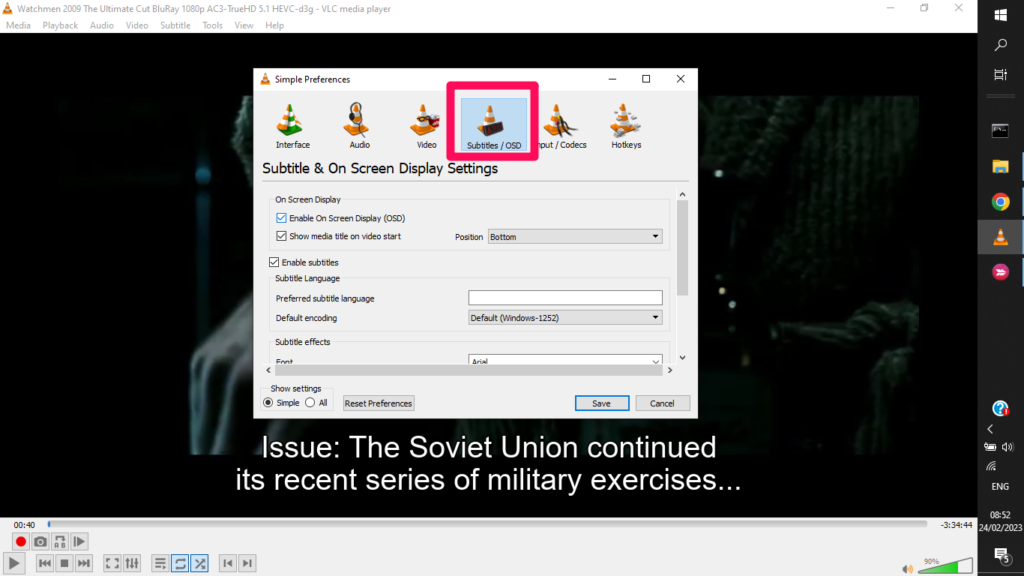
VLC Media allows you to adjust various settings for your subtitles. To access these settings, click on “Tools” in the menu bar and select “Preferences.” Then, click on “Subtitles/OSD” and you can adjust the subtitle font, size, color, and other settings.
Saving Subtitles Permanently
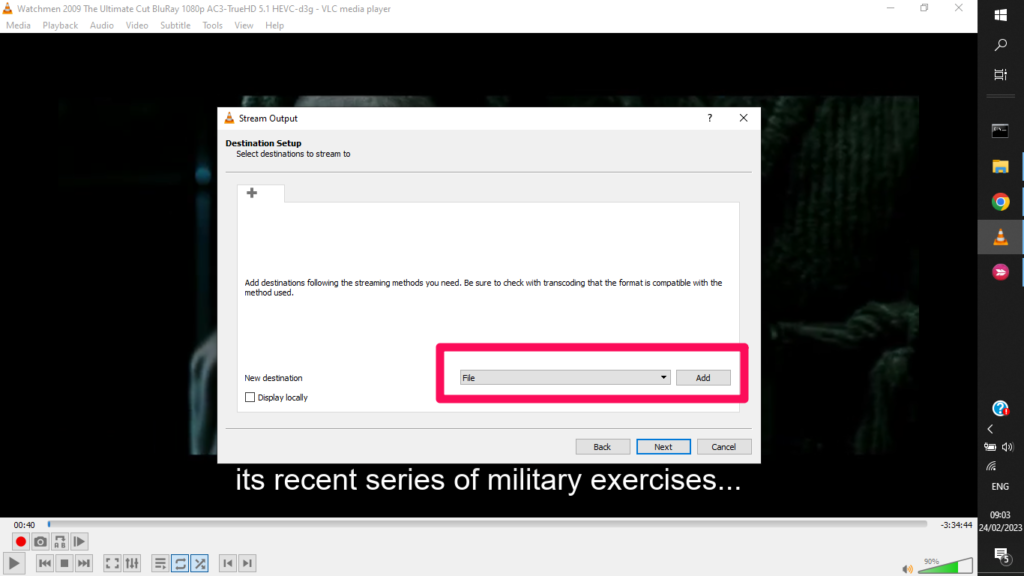
If you want to save the subtitles permanently to your movie file, you can do so by clicking on “Media” in the menu bar and selecting “Stream”. From there, select “Open” and navigate to the folder where you want to save the movie file. Make sure to change the file type to match the video file (e.g. MP4 or AVI).
- From the dialogue box, click on Add to upload the video to VLC.
- Check the “Use a Subtitle File” option, and click on Browse to add the subtitle file.
- Now, click on the Stream button, and then Next.

- Under the New Destination tab, select File, and click on Next.
- There, check the Activate Transcoding option, and select the Profile.
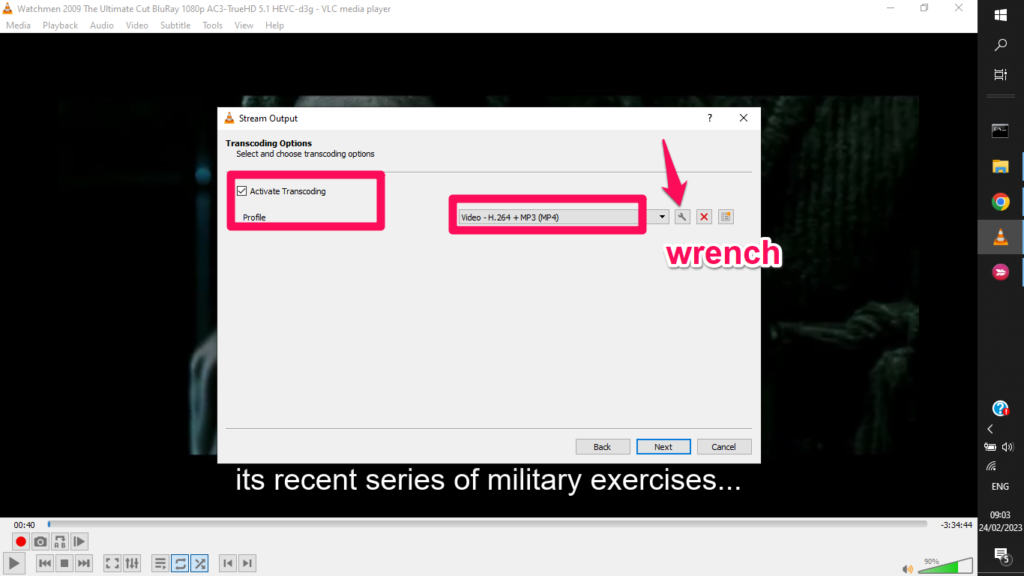
- Next, click the Wrench-shaped button, and press the Subtitles tab. At that moment, check both the “Subtitles” and “Overlay subtitles on the video” options.
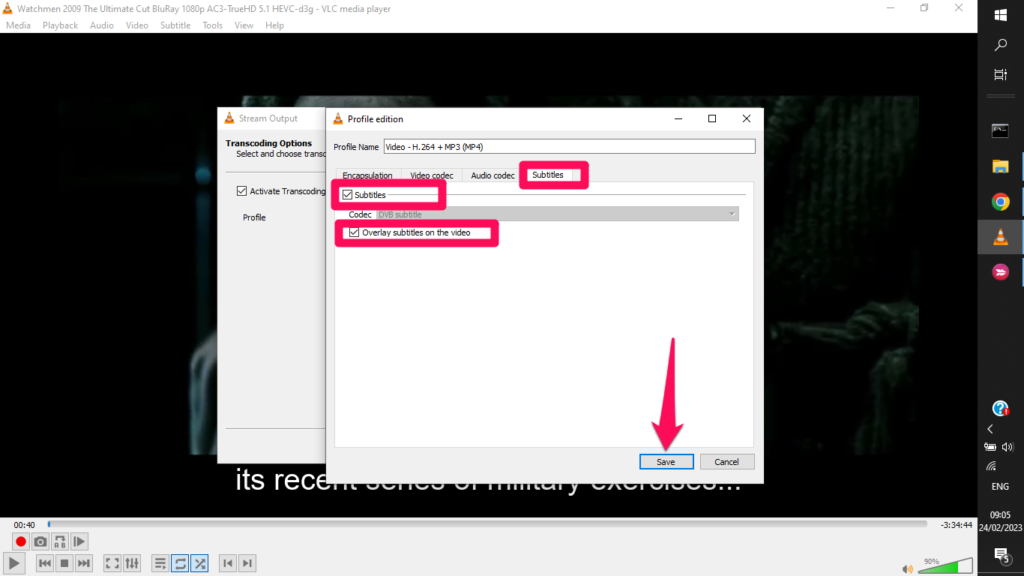
- Click Save, and then Next.
- Then, click on “Stream”
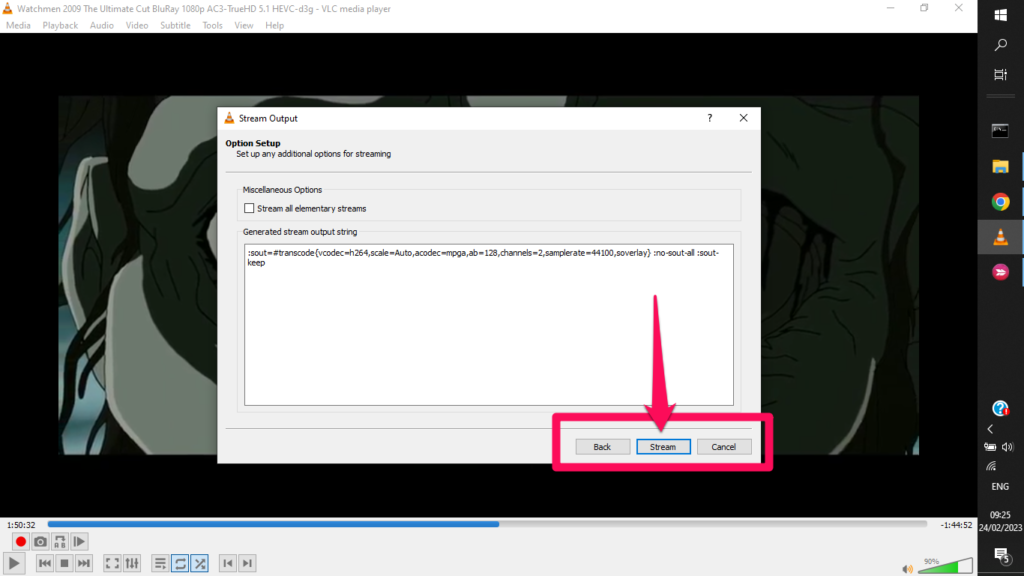
Great! Once the processing is done, you will find your video with hardcoded subtitles in the folder you’ve selected. So now you know how to hardcode subtitles with VLC!
Read More: Subtitles vs Closed Captions: What are the Differences?
Extra Tips
- If you have trouble finding subtitles for your movie, try searching for the movie title followed by the word “subtitles.”
- Some subtitle files may have errors or may not sync up properly with the movie. If this happens, try finding a different subtitle file.
- If you’re watching a movie with subtitles on a TV, make sure your TV supports subtitles and that they’re turned on.
Conclusion:
Adding subtitles to a movie can make it easier to understand and enjoy. With VLC Media, it’s easy to add subtitles to your movies and adjust various subtitle settings. By following the steps outlined in this article, you’ll be able to watch your favorite movies with subtitles in no time. Do let us now how you found this article in the comment section below, and how easily were you able to add subtitles to your movie.