

On 1st April 2018, Cloudflare launched its DNS service, promising a private, secure, and fast service. The company promised that they would not use user data for targeted advertising or sell it. They also revealed that the service would erase logs every 24hrs and that they would never keep logs of user full IP addresses.
That was their commitment to being a privacy-friendly service. Fast-forward to 1st April 2020, they announced a new service which is an expansion of their existing DNS service. The service is called “1.1.1.1 for Families”. The new service adds filters and new DNS Server IP addresses to automatically restrict against certain requests.
The company also revealed that the number one request from home users was a filtering functionality. That was the big reason behind the creation of the 1.1.1.1 for Families.
Related Article: Cloudflare’s WARP is a Free fast “VPN” with no Ads. Here’s how to get it
The New 1.1.1.1 for Families
This new service comes in two different tiers. The first one functions to block malware requests that are known. The second tier restricts against adult requests as well as malware. Below are the IPv4 and IPv6 addresses you need to configure the new DNS servers on any of your devices.


Tier 1: Blocking Malware Only
- To set up IPv4 use 1.1.1.2 as the Primary DNS
- To configure IPv4 use 1.0.0.1 as the Secondary DNS
- For IPv6 use 2606:4700:4700::1112 the Primary DNS
- For IPv6 use 2606:4700:4700::1002 the Secondary DNS
Tier 2: Blocking Adult Content And Malware
- To set up IPv4 use 1.1.1.3 as the Primary DNS
- To configure IPv4 use 1.0.0.3 as the Secondary DNS
- For IPv6 use 2606:4700:4700::1113 the Primary DNS
- For IPv6 use 2606:4700:4700::1003 the Secondary DNS
Cloudflare DNS with No Filtering
- To set up IPv4 use 1.1.1.1 as the Primary DNS
- To configure IPv4 use 1.0.0.1 as the Secondary DNS
- For IPv6 use 2606:4700:4700::1111 the Primary DNS
- For IPv6 use 2606:4700:4700::1001 the Secondary DNS
At the moment, content filtering is automated. But they plan to add other management options in the coming months. The options will be such as to blacklist or whitelist sites as well as scheduling filters to be active during certain times of the day. That means, currently, the only way you can bypass filters when a site you need to access is blocked is by switching off the DNS service.
Related Article: What’s DNS-over-HTTPS (DoH) and DNS-over-TLS (DoT) and why it’s controversial
How to Set Up 1.1.1.1 for Families
You should know that there are iOS and Android apps from Cloudflare that you can download on your device to use the DNS service.
1. Configure 1.1.1.1 For Families On Windows
- Open the Windows run box by using the Windows+R keyboard shortcut.
- Then open the Network and Sharing Center by typing in netcpl.cpl and press Enter. (Note: This may be unavailable in the latest Windows 10 Builds)
- If unavailable, go to the Network Icon at the system tray and Right-Click on it, then select Open Network & Internet Settings.
- Then click on Change Adapter Options on the page that opens.
- By Right-Clicking on the active connection, choose Properties.
- Next Double-click the Internet Protocol Version 4 (TCP/IPv4) option.
- Click on Use the following DNS server addresses to switch to it.
- Now, input both the Primary and Secondary DNS server addresses in the respective fields and click OK to close the window.


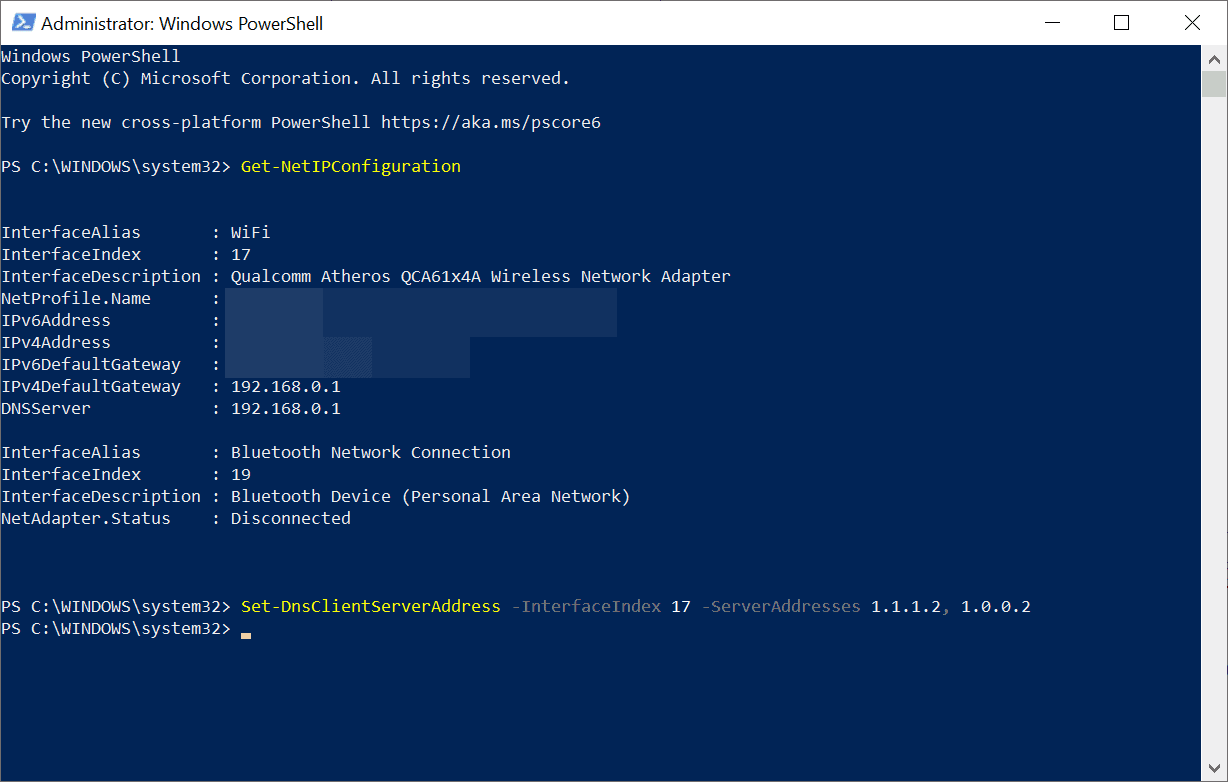
Here is a tip for the Pros on how to use Windows Powershell to configure the 1.1.1.1 for Families. Here is how you do it.
- Press the Windows key and type Windows PowerShell into the search box.
- Next click Run as Administrator on the right tab of the search result pane.
- Accept the UAC prompt.
- Paste the command Get-NetIPConfiguration and press Enter.
- Take note of the InterfaceIndex value of the connection you want to use. (You may use the InterfaceAlias value to identify the right connection if you have many)
- Modify the command Set-DnsClientServerAddress -InterfaceIndex 17 -ServerAddresses 1.1.1.2, 1.0.0.2 accordingly by adjusting the value after -InterfaceIndex to the correct one on your device, also change the IP address after ServerAddresses to your preferred DNS servers (Primary first then Secondary).
- Finally, run the command by pressing Enter.

Related Article: Speed up your internet with any of these public DNS Servers
2. Configure 1.1.1.1 for Families on Apple’s macOS
- Go to the system preferences by pressing Command+Space and then typing in System Preferences.
- Select and Click on the Network Icon.
- Then click on Advanced.
- Select the DNS tab and remove any IP addresses that could be listed already.
- Now input the relevant/respective IP addresses from the list we already provided as Tier 1 and Tier 2. For example, if you want to block malware on IPv4 you should input 1.1.1.2 and 1.0.0.2
- Finally, click OK and Apply.


Related Article: How to change the DNS Server on your Phone
3. Configure 1.1.1.1 for Families On Ubuntu
- Click System then go to Preferences.
- Next click Network Connections.
- Now select the Wireless tab and choose the network connection you want to configure.
- Then select either IPv4 or IPv6
- Clear any existing IP addresses and replace them with the relevant ones from the list we already provided as Tier 1 and Tier 2. For example, if you want to block malware on IPv6 you should input 2606:4700:4700::1112 and 2606:4700:4700::1002
- Click Apply
Related Article: How to change DNS server on Windows, Mac and Linux
4. Configure 1.1.1.1 For Families On Routers
Step 1: Use your browser to get to the IP address used to access the admin console on your router. Typical addresses for most common routers are:
- For Asus and Linksys routers use http://192.168.1.1
- For Netgear routers use http://192.168.1.1 or http://192.168.0.1
- Typically D-Link routers use http://192.168.0.1
- For Ubiquiti routers use http://unifi.ubnt.com
Step 2: Next input the router password.
Step 3: Browse within the admin console and find where the DNS settings are located. (This varies from router to router)
Step 4: Replace any existing addresses with the appropriate addresses we provided as Tier 1 and Tier 2.
Step 5: Save your new DNS server addresses and exit.


Now that you know how to set up 1.1.1.1 for Families, make it your responsibility to protect children within your household from the evils of the internet.
Related Article: How to Enable DNS-over-HTTPS(DoH) in Firefox and Chrome browsers