Your ISP (Internet Service Provider) dishes out a slice of internet based on internet speeds (measured in Mbps) and internet volumes (measured in KB/MB/GB). At times though, you might notice that web pages take their sweet time to load. This is despite a stable connection, and decent internet speeds and fast download speeds. A tentative explanation could very well be the sluggishness of the ISP’s DNS server.
Configured right, a DNS server can surely speed up your internet access. More to that, some DNS servers will go a step further and block malicious domains and adult sites. With your blessing, of course. Many actually protect your privacy to boot, although I imagine we ought to take that with a pinch of salt. And guess what? You can actually modify the DNS server by yourself either on your router or PC with a few clicks.
But let’s not get ahead of ourselves. Before we get to that, how about we give you the 411 on DNS, what it is and what it does. This won’t take long, I promise.
What is a DNS?
A Domain Name System (DNS) is an internet directory used to convert alphanumeric domain names to corresponding IP addresses. A fitting visual example is a switchboard operator (DNS server) as you’d find in large corporations i.e hospitals, companies, e.t.c. When you call the front desk, a switchboard operator checks a directory listing where everybody is and reroutes your call to the right person with whom you wish to speak.

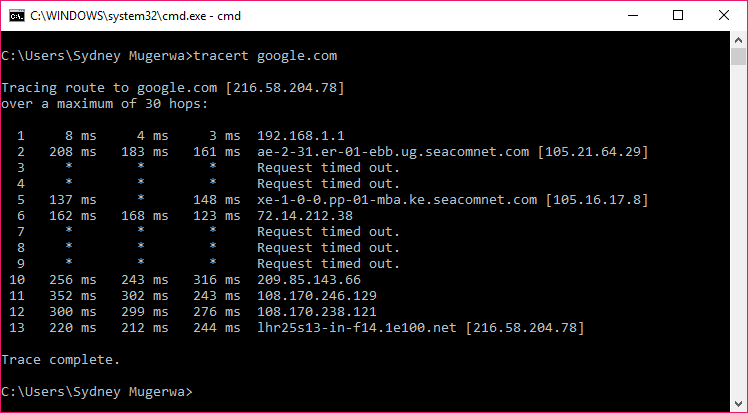
A trace-route of google.com
A DNS server is no different. It maps a domain name i.e google.com to the IP address of the server/s where the website is hosted. Once your PC has the right IP address, it can then access that website and the content therein. In the image above, we pinged google.com in command prompt and it returned the actual IP of that domain (216.58.204.78). You can actually check this out. Enter that IP (216.58.204.78) in your URL and see what you get.
By default, your ISP automatically dictates which preferred and alternate DNS server you use. Most people don’t even think about it. We just expect our internet to work once we load some data. A web page you load will have its IP address along with some other content such as images, iframes and ads from other IP addresses. The bottom line is all this will work to slow down your browsing experience.
Why should I modify my DNS server?

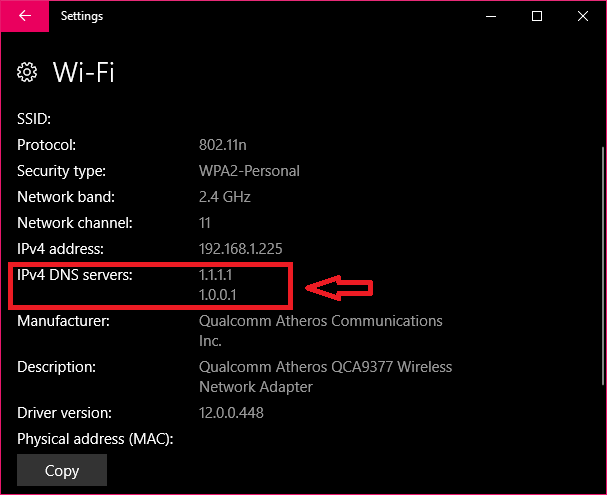
A Windows PC configured to Cloudflare’s 1.1.1.1 DNS
Various DNS service providers go over and above what your ISP’s DNS server offers. A little known open secret is that short of using a VPN (Virtual Private Network), an ISP will log your entire browsing history. Perhaps even sell it, if they get willing buyers (advertisers). In this age of big data, anything goes for the right price. Most of the DNS servers we will recommend are free and will offer you the following:
- Faster internet access by reducing latency
- Better security through encrypted browsing history.
- Filter malicious/adult content
Popular DNS servers
Some popular DNS servers include Google‘s own 8.8.8.8, Cloudflare‘s much-touted 1.1.1.1 and other like OpenDNS, Quad9 and more. Check out a rundown of these DNS servers along with their pros and cons in an excellent post on Dignited.
Related: Speed up your internet with any of these public DNS Servers
How to change your DNS server
For this tutorial, we will use Cloudflare’s 1.1.1.1 DNS server, but you can use any public DNS server you prefer. The bottom line is getting something that works for you. The speeds might not be earthshattering, or even noticeable at first, but I’d take anything that gives me a little control over my internet.
Change your DNS server on Windows 10
- Right-click on Network icon on the Taskbar.
- Click on Open Network & Internet Settings
- Scroll down to Network and Sharing Center and click on it.
- Click on Change Adapter Settings.
- Right-click on the Wi-Fi network you are connected to, then click Properties.
- Select Internet Protocol Version 4 (TCP/IPv4) or Internet Protocol Version 6.
- Click Properties.
- Click Use The Following DNS Server Addresses.
- Replace Preferred DNS server and Alternate DNS server with another of your choice.
- Click OK to close.
- Restart your browser.
>>Alternatively, you can simply hit the Windows button to search. Type Network and Sharing Center and then follow the steps from #4. This will work from Windows 7 onwards.
Change your DNS server on MacOS
- Open System Preferences.
- Search for DNS Servers and select it from the drop-down menu.
- Click the Plus (+) button to add a DNS Server and enter 1.1.1.1
- Click + again and enter 1.0.0.1 (DNS redundancy.)
- Click + again and enter 2606:4700:4700::1111 (DNS redundancy.)
- Click + again and enter 2606:4700:4700::1001 (DNS redundancy.)
- Click Ok, then click Apply.
Change your DNS server on Linux (Ubuntu)
-
- Click the Applications icon on the left menu bar.
- Click Settings, then Network.
- Locate your internet connection on the right pane, then click the gear icon.
- Click the IPv4 or IPv6 tab to view your DNS settings.
- Set the “Automatic” toggle on the DNS entry to Off.
Provide the 1.1.1.1 DNS addresses in the DNS entries field:
-
- 1.0.0.1
- For IPv6: 2606:4700:4700::1111,2606:4700:4700::1001
- Click Apply, then restart your browser.
Discover more from Dignited
Subscribe to get the latest posts sent to your email.


