Virtualization in Windows is a powerful technology that allows users to create and run virtual versions of computer resources, such as servers, storage devices, and operating systems, on a single physical machine.
This technology has gained significant popularity due to its ability to improve resource utilization, reduce IT costs, and provide greater flexibility in managing workloads. In this article, we will explore the concept of virtualization in Windows, how to check, enable and disable the feature.
What is Virtualization in Windows?
Virtualization in Windows involves creating virtual machines (VMs) that function as separate instances of an operating system within a single computer. These VMs are isolated from the host system and can run various software applications and even different operating systems independently. This technology has revolutionized the IT landscape, enabling businesses and individuals to optimize their hardware resources and streamline operations.
Related: PC Manager: Microsoft releases in-house System Tuner for Windows 10 and Windows 11
How to check and enable Virtualization on Windows 10/11
Before activating this feature, it’s recommended to verify if your device is compatible and whether the feature is currently deactivated.
Simply open the Task Manager; you can do this by pressing Ctrl + Shift + Esc keys simultaneously or by clicking the Windows button and searching for it. Once the Task Manager is open, navigate to the performance tab to determine whether the feature is enabled or disabled.

As you noticed, mine is enabled because I did enable it. Now let’s see how you can set up yours. If you’re using Windows 11, the steps are generally the same as for Windows 10. However, the appearance and location of settings might differ due to changes in the user interface. Always refer to your computer’s documentation for accurate instructions.
Related: How to use Screen Recording with the Windows 11 Snipping Tool
Step 1: Access BIOS/UEFI Settings:
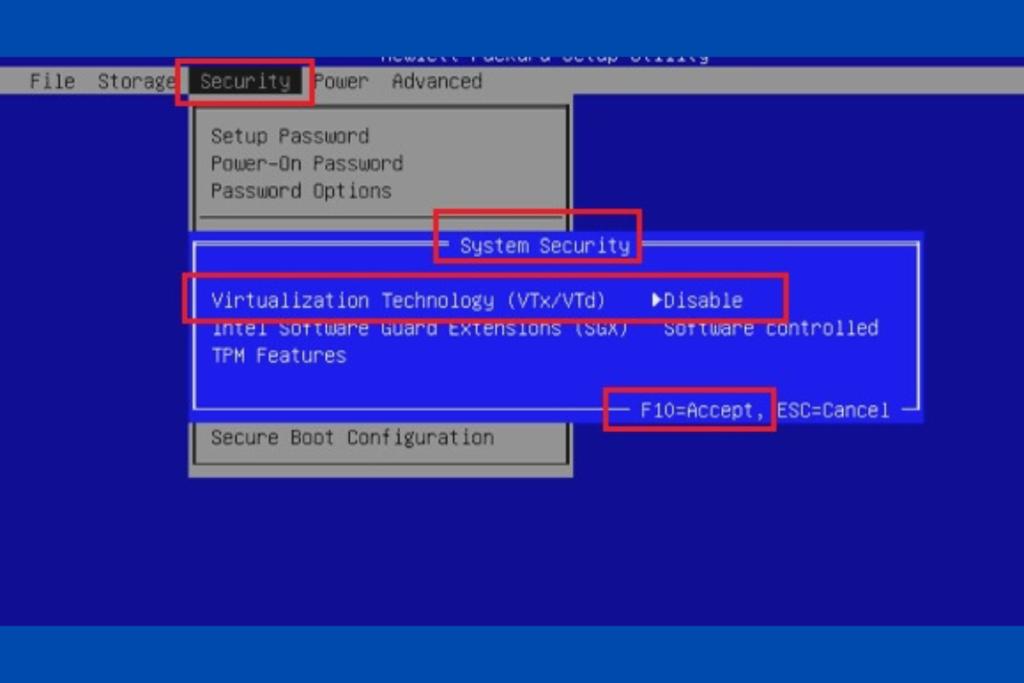
Virtualization is typically controlled through your computer’s BIOS (for older systems) or UEFI settings (for newer systems). To access these settings, restart your computer and repeatedly press the appropriate key during the startup process. Common keys include F2, F10, Delete, or Esc.
Step 2: Locate Virtualization Setting:
Once in the BIOS/UEFI settings, look for a setting related to virtualization. The terminology might vary depending on your system and BIOS version. Look for terms like “Virtualization Technology,” “VT-x,” “AMD-V,” or “Virtualization Extensions.” This setting is usually under Advanced Settings Tab.

Step 3: Enable Virtualization:
Change the setting to “Enabled” or “On.” Navigate through the BIOS/UEFI menu using your keyboard’s arrow keys and follow on-screen instructions to make the changes.
Step 4: Save and Exit:
After enabling virtualization, save the changes and exit the BIOS/UEFI settings. Usually, you can do this by pressing a key like F10, and then confirming the changes.
Step 5: Restart Your Computer:
Once you’ve saved the changes and exited the BIOS/UEFI settings, your computer will restart. Please note that the process might vary slightly depending on your computer’s manufacturer and model. It’s important to be cautious while making changes in the BIOS/UEFI settings, as incorrect settings can cause stability issues.
Also note that there is a difference between Virtual Machine platform, Hypervisor, and Virtualisation despite all being related.
Related: Windows Copilot: The AI Assistant You Didn’t Know You Needed
Wrapping Up!
It is essential to weigh the advantages against potential drawbacks, such as initial investment, performance overhead, and security considerations. For most organizations or users, the advantages of virtualization far outweigh the disadvantages, making it a valuable technology to enhance efficiency and flexibility in modern computing environments.
Discover more from Dignited
Subscribe to get the latest posts sent to your email.


