Unfortunately, despite our best efforts, laptop batteries are not blessed with eternal life. At some point, battery life will decline no matter what we do. Some practices will ensure your battery lives a long productive life and that’s as good as you get. These battery saving tips are not exhaustive, but it’s a start.
Tweak Windows Battery Settings
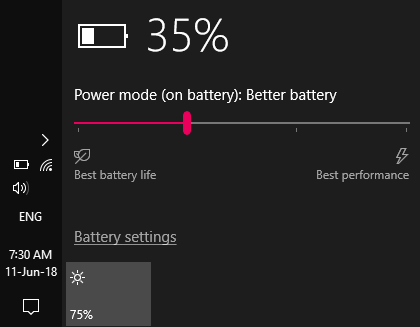
Battery Saver: Windows 10 has a built-in battery saver mode which automatically kicks in once you cross the 20% battery threshold. The Battery Saver Mode extends battery life by limiting background activities (like the fan), screen brightness, and push notifications when PC battery is running low.
Inquisitive users can go a step further to check which apps are affecting their battery life. In my case, it was Opera browser and Kakao talk, both of which I use extensively. There’s an option to let Windows decide when these apps can run in the background or making the decision yourself.
To customize battery setting in Windows, go to: Settings > System > Battery.
If you’re like me and have battery anxiety, you can manually or automatically enable Battery Saver at any percentage. I personally set it for whenever I get unplugged. There’s a quick way to control your power settings. Simply tap on the battery icon on your taskbar and dial the settings from Best Performance, Better Performance, Better Battery and finally Battery Saver.
Reduce Display Brightness
It goes without saying that a very bright display drains PC battery life. The same applies to most portable device screens, for that matter. Reducing the display brightness isn’t a magic pill to instantly make your laptop battery last longer, but it will give you some more juice to do your thing.
Most laptops have a keyboard shortcut to reduce display brightness. This comprises a combination of the Function button (Fn) and Brightness buttons (the icon is the sun). Pressing these buttons together will reduce your display brightness and probably help your battery conserve power.
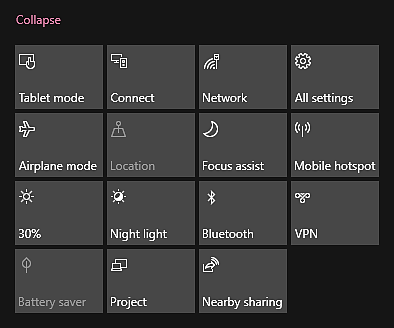
If this hasn’t worked for you, you can always go to the Action Center. Find the icon on your taskbar (the one that looks like a message box on the bottom right). Other than notifications, the Action Center has shortcuts to other features including Brightness. Tap on the Brightness icon to adjust it as you see fit.
Disable Wireless Communication/ Networking
Still in the Action Center, you can save battery by turning off WiFi, Bluetooth, Nearby Sharing. Mobile Hotspot and even Location. Doing this is similar to turning off mobile data on your smartphone when you intend to save on battery. These features usually run in the background but when not in use, or when you need to save a bit of battery while on the move, it figures that they need to go. Left unchecked, these processes drain your battery.
To reiterate what we just said, the quickest way to turn off wireless communication is through the Action Center. You will see the Action Center icon at the bottom right of your Taskbar (looks like a message box). You could individually toggle everything off. Alternatively, turning on Airplane Mode serves the same purpose of disabling all wireless communication such as WiFi, Bluetooth and Mobile data connection.
Disconnect Unused Devices
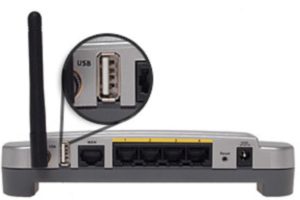
Devices and accessories such as a mouse, keyboard, flash drives, portable hard drives and others connected to your PC consume power. This also applies to DVDs or CDs in your drive, whether or not you are using them. I personally went a step further and disabled my DVD drive altogether, considering I rarely need to use it. One other thing, the wireless receiver is always transmitting data, so make sure to plug that out as well.
These devices consume power as the laptop has to power them on to work. The other thing is that usually when you plug them in, as is the case with portable hard drives, system resources are used to communicate and read them. This drains the battery in the process.
Disable Background/Startup Apps
Some software we use tends to have an annoying habit of autostarting when the computer is powered on. It runs in the background, even when we don’t actually need it to. In the process, more system resources are used forcing our PCs to work even harder, all of which drain the battery within no time.
To disable startup apps, we need to go to the Task Manager on Windows 8 through 10. The quickest way to get there is to right click on the Taskbar and selecting the Task Manager. Shortcut lovers have the option of pressing the combination of Ctrl + Shift + Esc to get there. Select the Startup tab and disable apps that have no business running without your say-so. In my case, it was Free Download Manager, Microsoft One Drive, Acrobat update and Skype.
Windows 7 users have to do it some other way but it does have its perks as we are about to find out. Use a key combination of Win + R to bring up the RUN command box. Type msconfig to open System Configuration. In the General tab, you can choose how your PC starts up. This could be a normal startup with all devices drivers and services, a diagnostic startup with only the basic drivers or a selective startup. Using a selective startup, you can choose not to load startup items, which will consume your battery.
If this is all complicated you can simply head over to the Startup tab to choose which apps to disable, the same way we did for Windows 8 and Windows 10 users. It works the same way, we should add. Remember that once you are done, you either have to look for the apps to shut them down, or to restart your PC altogether. This way, they will no longer run in the background.
In conclusion
Keep in mind that it’s not advisable to suck your battery dry to 0% every time. Also, don’t forget that heat is the enemy. Keep your battery as cool as a cucumber. Whenever you have power, keep it your PC plugged in if it’s not much of a bother. This will take the stress off your battery and hopefully, it will be energized for when you need it on the go.


