Chromebooks have become the laptop of choice for many individuals in the educational field, those who travel a lot, and of course, students. These laptops are great for their simplicity, their low price and durability. In this guide, we shall discuss how to set up a Chromebook quickly and properly.
Setting up a Chromebook is a breeze, but there are definitely things you need to know. Here is an easy step-by-step tutorial that covers everything you need to know about setting up the new ‘Google laptop”.
What you need
- A Google account or Gmail account
- Internet connection
If you don’t have a Google account, go ahead and create one via google.com/accounts. You can also just use your Gmail account to login to your Chromebook. If you don’t already have one or if you don’t want to use your Google account to login to a Chromebook, then you can also use it as a guest user. However, note that using a Chromebook in guest mode has limited functionality.
Using the Chromebook for the first time
Ensure your Chromebook is plugged into a power source before powering it on. Also, make sure that you use the power adapter that comes with the Chromebook when charging. All Chromebooks typically charge using a USB-C charger. So you can technically use your smartphone’s USB-C charge to power on your Chromebook if you don’t have the original cable.
Then tap the power button on the top right-hand side of the keyboard to power it on. Once your Chromebook powers on, you will see on-screen instructions asking you to choose your language and the WiFi network you would like to connect to. After this, sign in with your Google account, and you are in.
Related Artice: Chrome OS Review for Beginners: Is It More Than Just a Glorified Browser Now?
Navigating the Chromebook
After logging in, you will see the Chromebook’s desktop. Unlike with the Windows system, this desktop doesn’t include icons. At the bottom of the desktop is the shelf (boxed in the illustration) where you can access apps currently running or pinned. You can always install more Apps from the Google Play store.
On the bottom right, you will see the status tray (circled in the illustration), which gives you access to your settings and the button to power off your Chromebook.
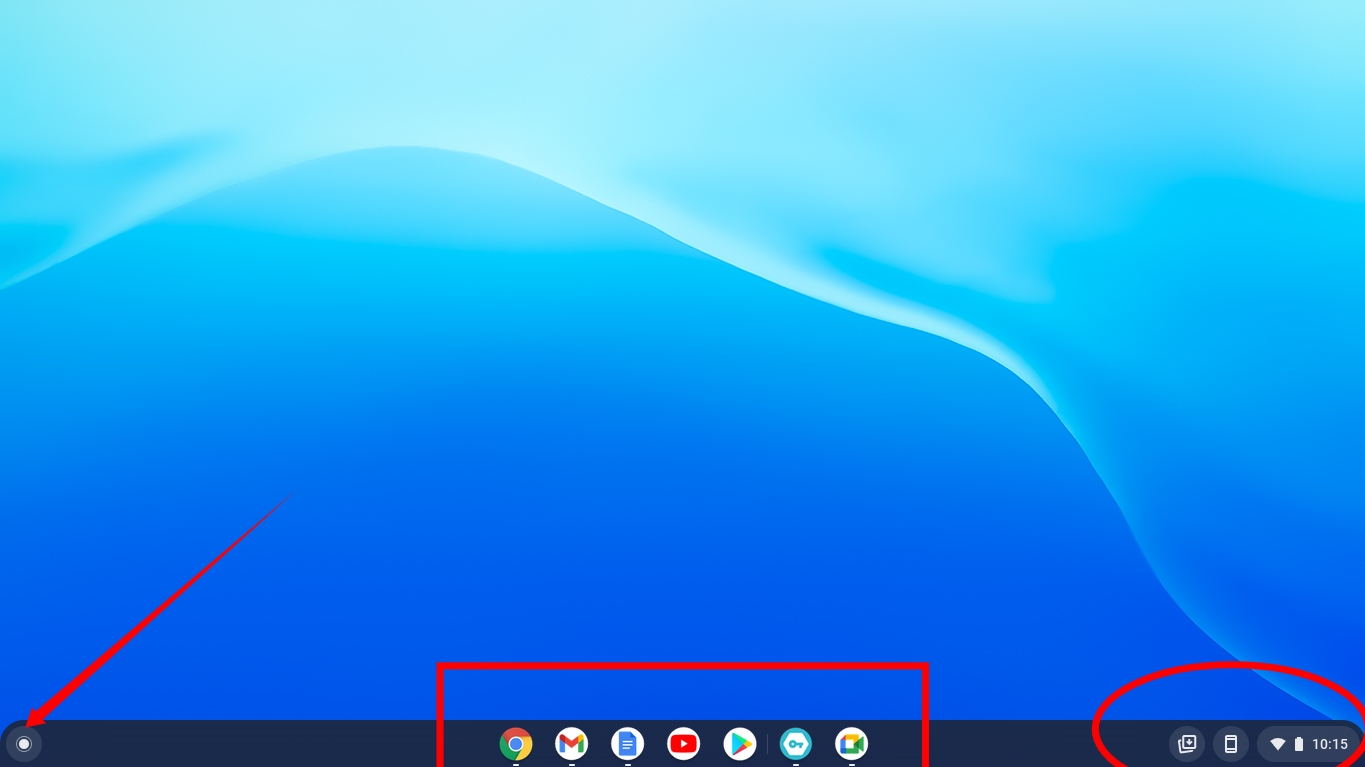
On the bottom left, there is a circle icon called the apps launcher (arrowed in the illustration). If you want to view all your apps, click on the circle icon and select all apps. The theme is very similar to those on the phone running stock Android.
If you want to group apps, for example, have social media apps in one tray, drag one app on top of the other you would like to group it with, and create a group.
To pin apps to the shelf, two-finger click (right-click) and select pin to shelf. Note: To right-click on a Chromebook, click using two fingers on the trackpad instead of using one finger.
Chromebook Settings
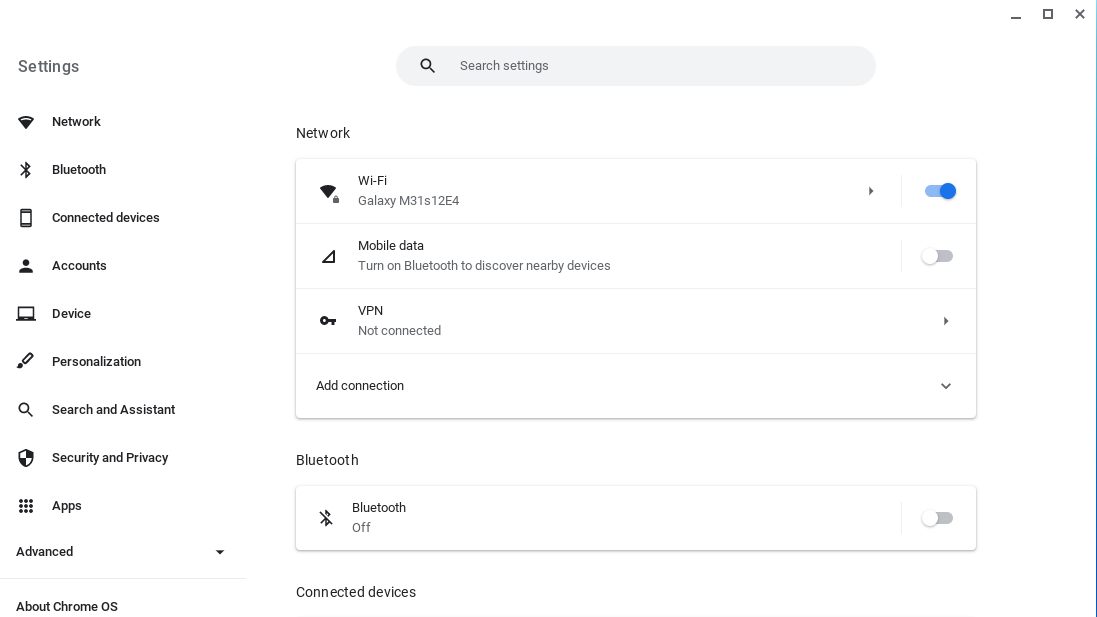
If you want to access your Chromebook settings, click on the status area on the bottom right. Here you will see your networks, settings, and battery life, among others. The question mark icon opens the get help app with helpful articles about the Chromebook.
Tap the gear icon to access settings from which you can use the search bar to search for a particular setting you want to change.
Quick Tips when getting started with a chromebook
- Use two fingers and move them up or down on the trackpad to scroll.
- Click the trackpad with two fingers to right click.
- For a full list of keyboard shortcuts, click CTRL + ALT + ?
I got the ASUS C223 Chromebook from Odukar Store, and from first impressions, it’s a cool handy machine to carry around on my day to day errands. Chrome OS is a simple operating system that anyone, even me, can use! Get yours, set it up and start browsing!
We have created a step-by-step video guide on how to setup and use a new Chromebook. You can watch it below;
Discover more from Dignited
Subscribe to get the latest posts sent to your email.


