If you are looking for a way to improve your smartphone photography, you might want to try GCam. GCam is short for Google Camera, a camera app developed by Google for its Pixel smartphones. GCam offers advanced camera features, color accuracy, and image processing capabilities which may not be available on the default camera app of your phone.
However, GCam is not compatible with all smartphones out there. You need to find a ported or modded version of GCam that works on your device. This can be a daunting task, as there are many websites and Telegram channels serving up different GCam mods. How do you know which one to choose?
In this blog post, we will guide you through the process of installing GCam on your smartphone using GCam Hub, a download hub for some of the Google Camera mods from various developers. We will also explain some of the features and settings of GCam that you can tweak to get the best results.
What is GCam Hub?

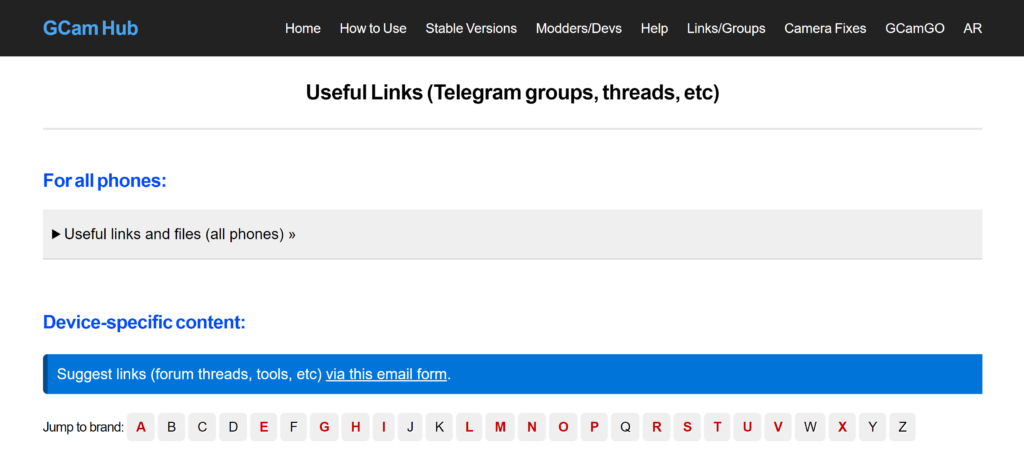
GCam Hub is a website that provides links to download GCam mods for various smartphone models and brands. It also has useful information such as how to use GCam, frequently asked questions, groups, and threads for discussion and support, and suggested versions for different devices.
GCam Hub is not affiliated with Google or any of the developers of the GCam mods. Some of the popular developers include Arnova8G2, BSG, Nikita, Urnyx05, and Wichaya to mention a few. Keep in mind that GCam Hub is just a mirror site that hosts files from other sources. You should always check the original source of the files and read the reviews and comments before downloading and installing any GCam mod.
How to install device-specific GCam mods:
This method is recommended if you want to find a GCam mod that is tailored to your specific device model and brand. A number of developers have built a reputation around modding specific Gcam versions. Here are the steps:
- Go to www.celsoazevedo.com/files/android/google-camera/links/ on your smartphone browser. Alternatively, you can use the XDA route (www.xda-developers.com/google-camera-port-hub) which will send you to the same download links.
- Scroll down to find your device model and brand in the list. If you don’t see it, you can use the search function or check the other categories such as “Other devices” or “All devices”.
- Tap on your device name to see the available GCam mods for it. You will see links to download the APK files, as well as links to XDA developers, subreddits, or Telegram groups for more information and camera fixes.
- Choose a stable or good version of GCam mod for your device and tap on the download link. You may need to allow downloads from unknown sources in your browser settings.
- Once the download is complete, open the APK file and install it on your device. You may need to grant permissions for the app to access your camera, microphone, storage, and location.
- Install additional XML configuration files to get the best possible color accuracy and extra features. These files are provided in the links on GCam Hub or in the groups and threads mentioned above.
- Launch the GCam app and enjoy!
Note: GCam works best when you already have the Google Photos app installed on your device. But most importantly, make sure your device supports the Camera2 API. The quickest way to do that is to download this app on the playstore https://play.google.com/store/apps/details?id=dev.zwander.cameraxinfo&pli=1
How to install generic stable GCam mods
This method is suitable if you want to try out the latest stable version of GCam that works on most devices running Android 7 or higher. Here are the steps:
- Go to www.celsoazevedo.com/files/android/google-camera/ on your smartphone browser.
- Tap on “Stable Versions” in the menu section.
- Choose a Google Camera based on your supported Android operating system. For example, if you have Android 11, you can choose “Google Camera 8.x (Android 11+)”.
- You will see a list of GCam mods from different developers with their features and changelogs. Some of the popular developers include Arnova8G2, BSG, Nikita, Urnyx05, and Wichaya to mention a few.
- Choose a GCam mod that suits your preferences and tap on the download link. You may need to allow downloads from unknown sources in your browser settings.
- Once the download is complete, open the APK file and install it on your device. You may need to grant permissions for the app to access your camera, microphone, storage, and location.
- Install additional XML configuration files to get the best possible color accuracy and extra features. You can find these files in the links provided by GCam Hub or in the groups and threads mentioned above.
- Launch the GCam app and enjoy!
Note: GCam works best when you already have the Google Photos app installed on your device.
How to install GCam XML configuration files

Some GCam mods don’t require any further tweaking because the developers already did the dog work for you. But others do need you to manually tweak your GCam to get the desired image quality. But why bother when you can download an XML file with all the minutiae tweaked for you by people who understand the settings better? That’s the route I often take because I honestly don’t know much about how to get the best color accuracy.
- Download the XML file corresponding with your smartphone brand from GCam Hub or XDA Developers.
- Grant the GCam app permission to access all files on your phone. You can do this by going to Settings > Apps > GCam > Permissions > All files access and toggling it on.
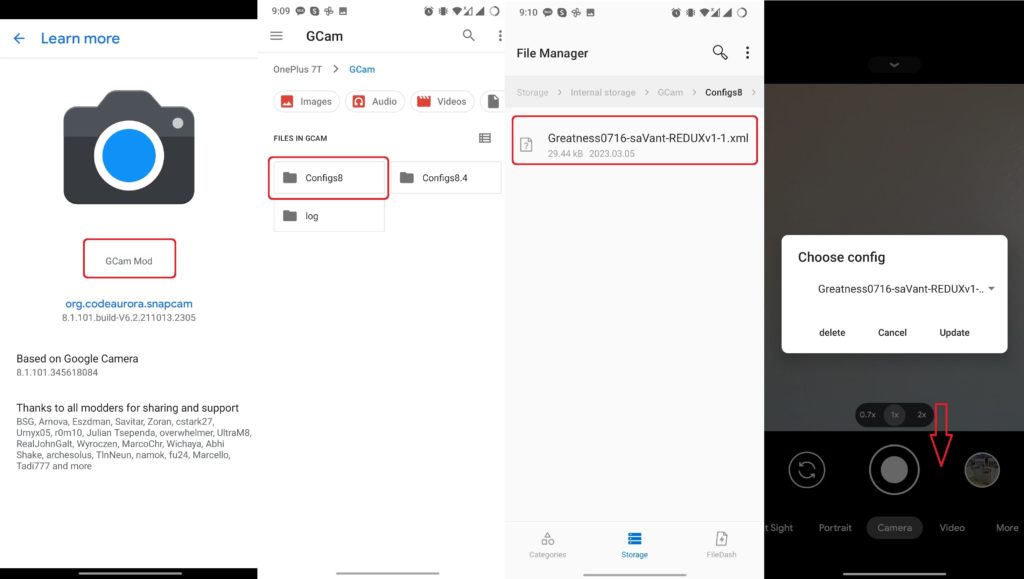
- Create a folder named GCam in your phone’s internal storage. Inside this folder, create another folder named Configs, Configs7 or Config8, depending on the version of your GCam mod.
- Copy or move the XML file you downloaded to the Configs/Configs7/Configs8 folder.
- Open the GCam app and double tap on the black area next to the shutter button. A dialog box will appear with a list of available XML files.
- Select the XML file you want to use and tap on Restore. The GCam app will restart and apply the settings from the XML file.
That’s it! You have successfully installed an XML configuration file for your GCam mod. You can switch between different XML files anytime by repeating steps 5 and 6.
Using GCam on your smartphone
Once you have installed and configured GCam on your smartphone, you can start using it as your default camera app. You will notice that your photos and videos look better than before, with more details, colors, and dynamic range. However, some features might not work properly with GCam, such as unsupported cameras, broken time-lapse and slow motion, etc. To fix this you can try different XML configuration files or different GCam mods to fix these issues.
Discover more from Dignited
Subscribe to get the latest posts sent to your email.


