In case you recently purchased a new PC, there’s the likelihood you’ll want to extract files from your old computer to the new one. Better yet, you might need some files from a colleague’s PC, hence the need to share files through a means of connection.
Well, gone are the days when sharing files between two PCs are usually very difficult. As the years roll by, transferring files on Windows PC gets easier and easier. This isn’t unexpected because as more innovative as tech gets, things get simpler.
Meanwhile, one easy method to share files between Windows PCs is the use of USB-to-USB cable. That in itself is a reason to use this method: its simplicity. This method’s simplicity ultimately saves time as a matter of fact.
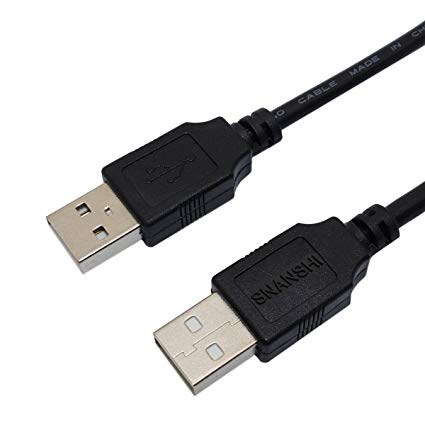
A USB-to-USB cable is a cable that has both male USB connectors (Type-A) on both ends. This is unlike the very common USB-to-MicroUSB cable which is used in connecting a PC to smartphones or other devices. The USB-to-USB cable is also called a bridging cable.
But then, the unavoidable question is: How can the connection of Windows PC through USB-to-USB cable be done? Well, we’ll be looking at that extensively as we proceed.
Connecting two Windows PCs with a USB-to-USB cable
To use this method, there have to be certain prerequisites such as:
- The Windows PCs
- USB-to-USB cable
- A compatible data transfer software
When the USB-to-USB cable is purchased, an installation disc is likely to come with the package. The disc contains the software which is provided by the manufacturer in order to facilitate the process. If no disc comes with the package, the software can be alternatively downloaded on the manufacturer’s website.
Provided that these conditions are in place, this is how the process is carried out:
- Start the two Windows PC and allow their startup to be complete.
- Then, you’ll insert the disc into each PC’s CD/DVD ROM, and run the installer package (data transfer software).
- In case if you downloaded it directly from the website, you just need to install the software directly from the downloaded folder.
- Next, you’ll connect both ends of the USB-to-USB cable to the two PCs.
- Ensure that both computers are not far from each other to avoid stretching the cord beyond normal or to shake during a transfer.
- Now, locate the software in the Start menu and launch it on both Windows PCs.
- The software will have the appearance of a File Manager, and it will contain two windows called Local and Remote. Local represents the computer being used at the moment while Remote is for the other PC.
- To copy or send files, the files can be dragged from Local to Remote, and vice versa on both computers.
- Once transfer/sharing of files are done, the cable can then be removed.
Just like that, files can be shared between the two computers with the bridging cable. So, you don’t have to face many challenges when you intend to share a file from a Windows PC to another Windows computer.
However, there are a couple of other alternative methods to PC-to-PC transfer using a USB-to-USB cable. This includes:
- Use of flash drives & external hard drives: On one PC, the flash drive / external hard drive is connected in order to copy the files. It is then ejected and inserted into the other PC wherein the copied data is pasted.
- Setting up a local area network (LAN) on one computer while another computer can connect to the network and course through the PC’s files in its hard drive.
- Cloud storage usage which involves the use of the internet.


