The synergy between Windows and Linux has long been a sought-after goal for tech enthusiasts and developers. Running Ubuntu, a popular Linux distribution, alongside your Windows operating system can be immensely beneficial. In this article, we will provide a comprehensive guide on how to install Ubuntu on Windows using the Windows Subsystem for Linux (WSL) via the command prompt.
Why Use WSL for Ubuntu?
WSL is a compatibility layer for running Linux binary executables natively on Windows 10 and later. It allows you to enjoy the best of both worlds: the familiarity of Windows and the robustness of Ubuntu. Here’s why you might consider using WSL:
- Seamless Integration: With WSL, you can run Ubuntu alongside Windows applications, enabling easy access to the Linux terminal without the need for a virtual machine.
- Lightweight and Efficient: WSL consumes fewer resources compared to a full virtual machine, making it a quicker and more efficient solution.
- Developers’ Paradise: For developers, WSL is a game-changer. You can utilize Linux tools, compilers, and libraries without the hassle of dual-booting.
Related: Getting Started With Windows Subsystem for Linux
Installing Ubuntu on Windows with WSL
Prerequisites
Before diving into the installation process, ensure you have the following prerequisites in place:
- Windows 10 or Later: WSL is officially supported on Windows 10 and Windows 11. Ensure your system is up to date.
- Windows Subsystem for Linux: Make sure WSL is enabled on your Windows machine. To enable it, open PowerShell as an administrator and run the following command:
- Command Prompt or PowerShell: You’ll need a Windows command-line interface for the installation.
Here is an article that can get you started on using Windows Subsystem for Linux Environments. Follow these few steps to install Ubuntu on Windows using the command prompt:
In this article, we will proceed with the installation of version 20.04. However, please note that you can opt for a different version according to your preferences. Additionally, I’m utilizing Windows Terminal, a third-party application available on the Microsoft Store. This alternative is known for its efficiency compared to the default Windows command prompt.
Step 1: Open Command Prompt
Launch Command Prompt or PowerShell as an administrator. You can do this by searching for “cmd” or “PowerShell” in the Windows search bar, right-clicking the result, and selecting “Run as administrator.”

Step 2: Install Ubuntu
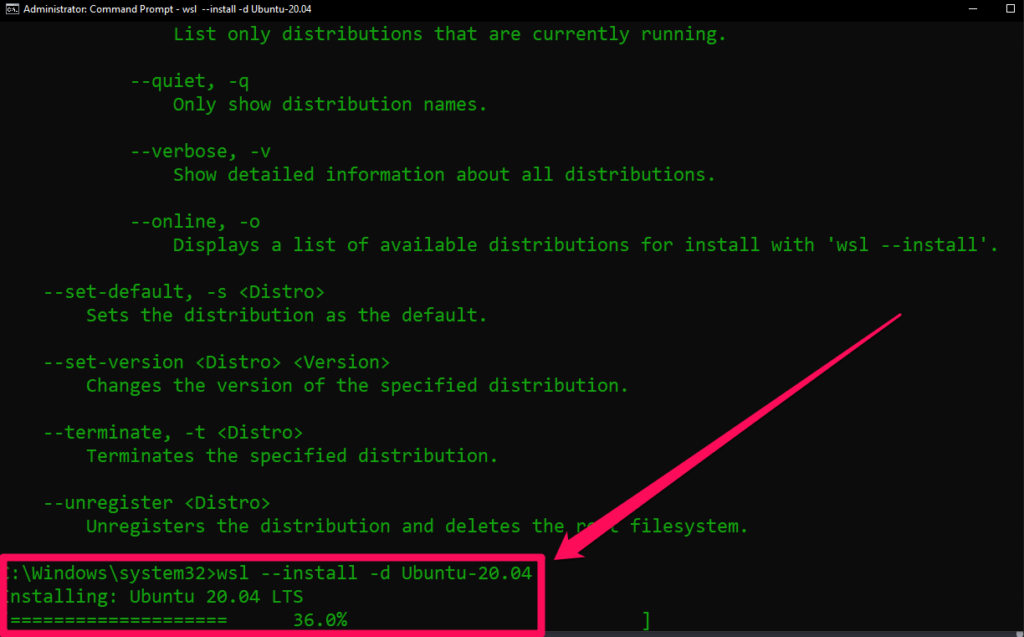
In the command prompt, type the following command and press Enter: “wsl –install -d Ubuntu-20.04”. The -d stands for the distro to be installed.

Step 3: Create an Ubuntu User
Once the installation is complete, you will be prompted to create a username and password for your Ubuntu installation. Follow the on-screen instructions to set these credentials.

The password fields are not visible and hidden; just ensure to retype the correct password.
Related: 5 Great Linux Operating Systems to Try Out in 2023
Update Ubuntu: After creating a user, Ubuntu will update its package list. This may take a few minutes.
You’re Ready to Go: Congratulations! You now have Ubuntu running within Windows. You can access it by typing “wsl” or “wsl ubuntu” in the Command Prompt or PowerShell.
Using Ubuntu on Windows
Once you’ve installed Ubuntu through WSL, you can use it just like a native Ubuntu installation. Some key commands and tasks include Ince I am using Windows Terminal instead of the default command prompt, I can see all distros listed here using the dropdown menu;

Here is what you can do
- Running Linux Commands: You can run Linux commands in your Ubuntu terminal just like you would in a native Linux environment.
- Installing Packages: Use
aptto install new software and packages on your Ubuntu instance. - File System Access: Your Windows files are accessible in Ubuntu, typically under
/mnt/followed by the drive letter. For example, your C drive would be located at/mnt/c/.
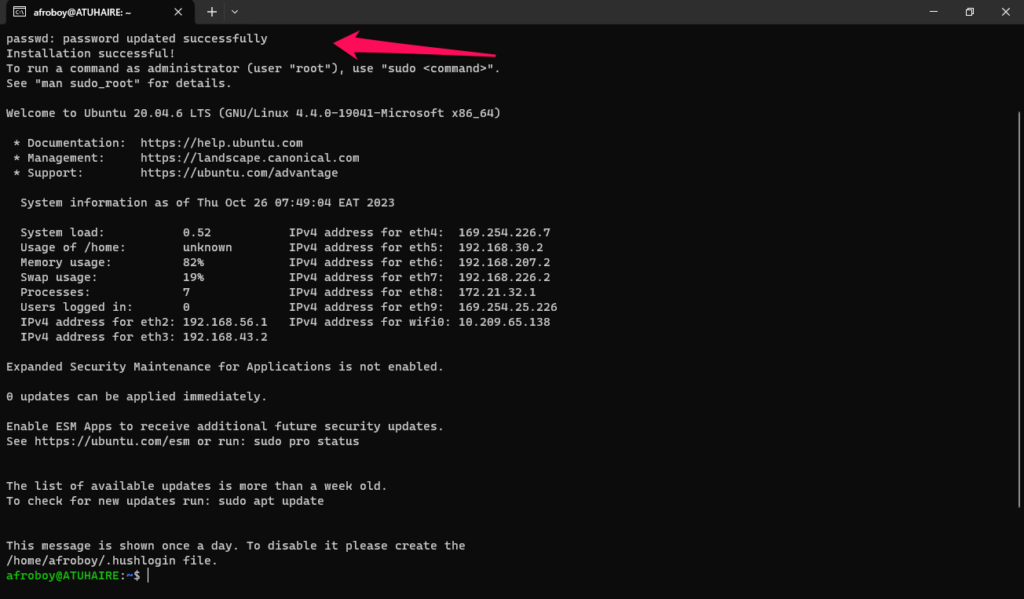
Here is how mine appears after a successful installation.

Related: Top 10 Basic Linux Commands for Absolute Beginners
Troubleshooting and Tips:
- You can access Ubuntu from the Start menu or by typing “wsl” in the Windows Command Prompt or PowerShell.
- You can use the
wsl --listcommand to see a list of all installed Linux distributions. - You can use the
wsl --set-defaultcommand to set a default Linux distribution. - You can use the
wsl --unregistercommand to uninstall a Linux distribution.
If you have any problems installing or using Ubuntu on Windows, you can consult the WSL documentation or the Ubuntu documentation. You can also search for help online or contact the Ubuntu community for support.
Conclusion: The Best of Both Worlds
With Ubuntu running seamlessly on your Windows system via WSL, you have a powerful and flexible development environment at your fingertips. Enjoy the world of Linux without leaving your familiar Windows environment. Do let us know if you have found this article very insightful or helpful in the comment section.
Discover more from Dignited
Subscribe to get the latest posts sent to your email.


