Ubuntu officially cut off support for Wubi, their Windows Based Ubuntu installer a few years back. They sited degraded performance and many bugs for this move, to the dismay of many Ubuntu lovers. Wubi was a straightforward, painless way to install Ubuntu on your Windows PC. Wubi worked like any other application on Windows. It installed Ubuntu on Windows like you would install any other application. On rebooting you would be presented with the choice of the Operating system you would like to boot into. It was easy, it took out the guess work that often comes with installing any Linux Distro. It was safe as there was no chance of you messing with disk partitions, potentially formatting the wrong partition, loosing your data.
Luckily, some developers out there didn’t quite give up on Wubi. Thanks to a Github project, users can still use Wubi to install the latest version of Ubuntu alongside Windows.
How to get WUBI.
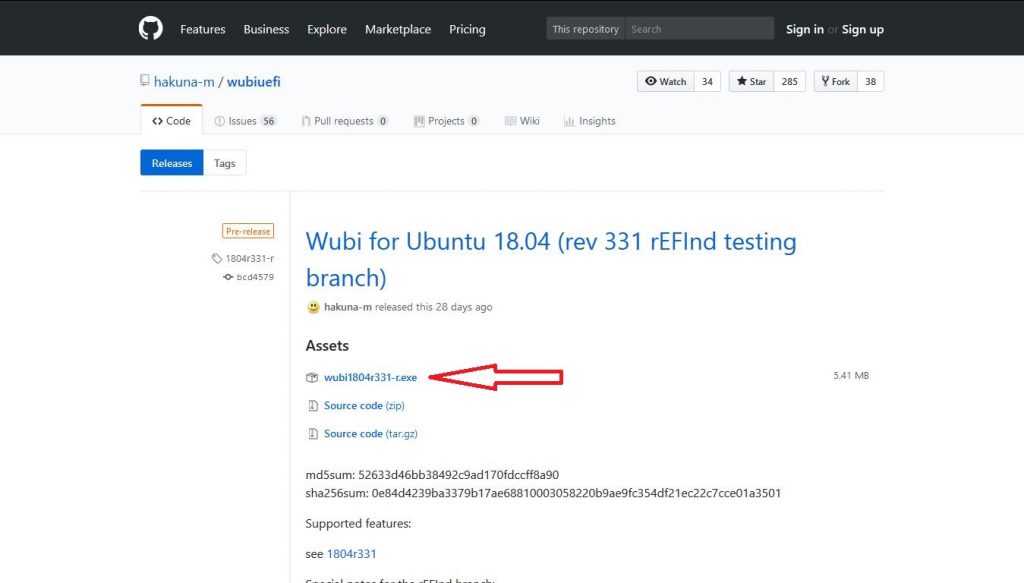
Back in the day, Wubi came in the Ubuntu iso file but after being discontinued that too ceased. To get Wubi for the latest version of Ubuntu, head on to the project’s Github page. Get the latest version available, but be sure to go through the release notes, make sure you are aware of any bugs.

Personally, I like going for the Long-Term-Release (LTS) versions. Their releases are a little far between so they get enough time to mature so they are less buggy. Right now, you are better off going for Ubuntu 18.04. It is the current latest version of Ubuntu. But then if you are a sucker for stability and not necessarily everything bleeding edge, you will be more than happy with Ubuntu 16.04 LTS.
How to Install Ubuntu on Windows.
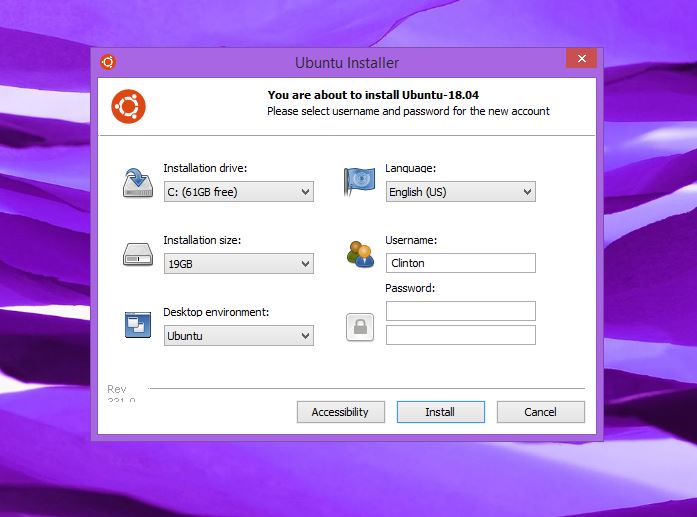
After downloading the version of Wubi you want, simply double click on the Wubi.exe file to run it. Windows firewall might ask you to confirm running the application. Click ‘Yes” to proceed. The Wubi interface will then pop up.

To proceed;
- Choose the drive you wish to install Ubuntu to by selecting the appropriate drive under “Installation Drive”.
- Choose how much disk space to set aside for Ubuntu by selecting the size under the “Installation Size”.
- Choose the desktop environment from the drop down list. This list is slightly misleading. For the default Ubuntu with Unity desktop stick with “Ubuntu”. “Ubuntu GNOME” has the GNOME desktop environment which is very similar to Unity. Kubuntu uses the KDE Plasma desktop environment, Xubuntu uses the lightweight and highly customisable XFCE desktop environment, Lubuntu uses the lightweight LXDE desktop environment. There are various other options that are less well known.
- Choose the language to be used for Ubuntu by selecting it from the drop down.
- Enter the default username for using with Ubuntu
- Enter the password and repeat it in the box underneath
- Click “Install”
The WUBI installer will then connect to the web and download the flavor of Ubuntu you chose. I advice that you select stock Ubuntu, it strikes a nice balance between all the above mentioned distros.
Booting into Ubuntu
The Installer will create the space to install it on your PC. You will be asked to reboot and when you do Ubuntu will load and the files will be copied and installed. And that is it, Ubuntu is installed on your PC. All you need to do is reboot your computer and you will be presented with a screen asking you to choose which Operating System you want to boot into.
Many experts are against installing Ubuntu in this way. To them, Wubi is outdated and ‘needs to die a quick and painless death so they can get on with providing positive experiences to new users of Ubuntu.’ What these people don’t understand is, while Ubuntu really has come a long way, people are still not quite ready to go all in with Linux. Windows is here to stay and to most, asking them to dedicate a whole partition to Ubuntu, a partition they may not have in the first place, is asking too much.
There are concerns about the safety of this method that is not officially supported, which is a legitimate concern. But then this is all free and open source software, just like Ubuntu itself. Still, a word of caution, this is not the optimum way to run an operating system. It is however really easy for trying things out. So go on, try it out.
Discover more from Dignited
Subscribe to get the latest posts sent to your email.


