Have you ever needed to share an image quickly and easily with someone online? Perhaps you needed to send a photo to a friend or share a screenshot with a colleague. Whatever the reason, sharing images online can often be a frustrating process. Email attachments can be slow and clunky, and many messaging apps compress images or limit their size.
Fortunately, there’s a better way. Pasteboard is a free online tool that allows you to share images quickly and easily with anyone, anywhere in the world. With Pasteboard, you can upload an image, copy a link, and share it instantly.
In this post, we’ll take a closer look at how to use Pasteboard to share images online easily. We’ll cover everything from uploading images to sharing links, and we’ll provide some tips and tricks along the way. So let’s get started!
Related: What is Pastebin: Usecases, Getting Started, Tips and More
Uploading Images to Pasteboard
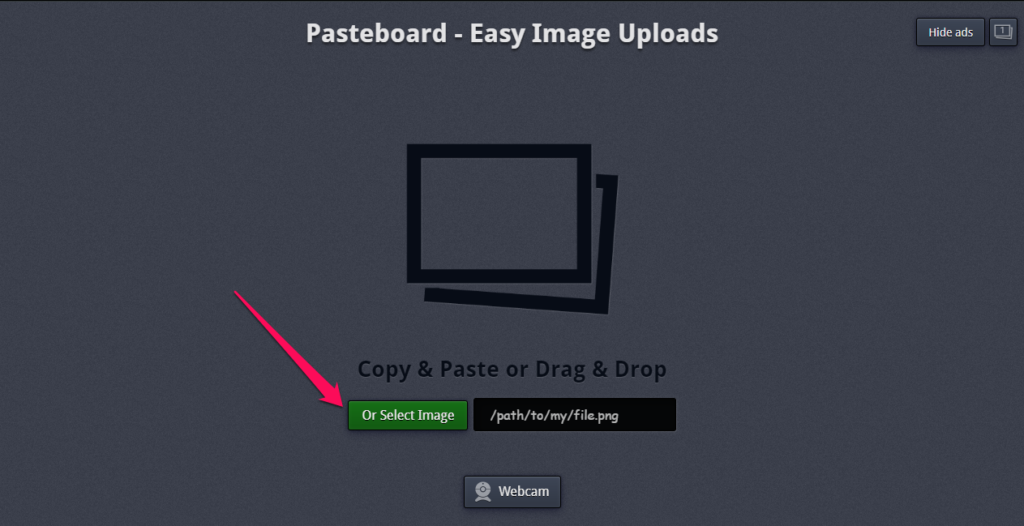
The first step in sharing images with Pasteboard is to upload your image to the platform. It has four ways of uploading the image; you can copy & paste, drag & drop, use a webcam, or with the upload button which I will use in this article. Here’s how: No account is needed!
Step 1: Navigate to the Pasteboard website in your web browser.
Step 2: Click the “Or Select Image” button to select the image you want to upload from your computer.

Step 3: Choose your image.
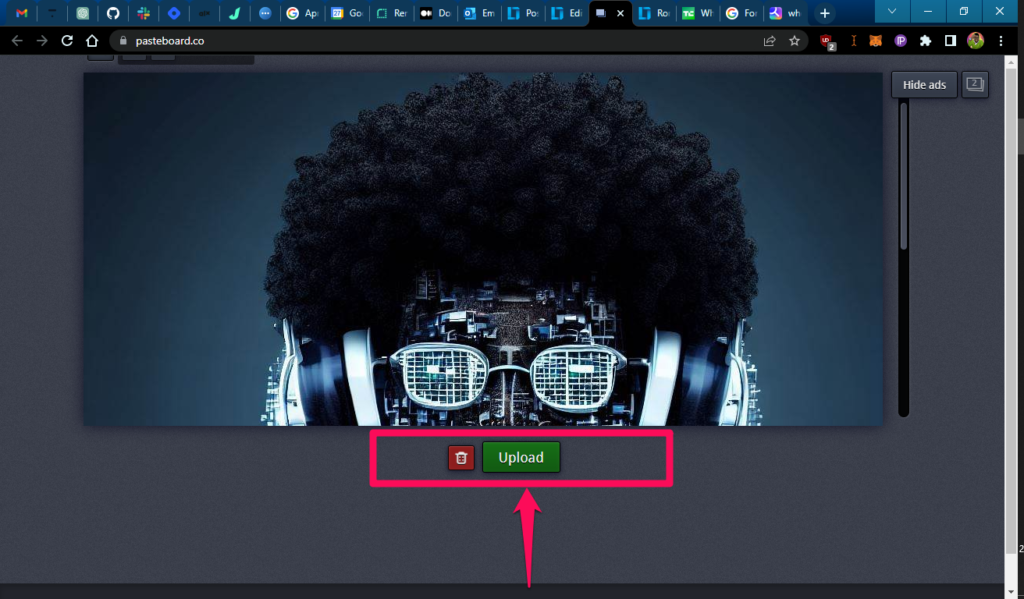
Step 4: Once you’ve selected your image, click the “Upload” button to upload it to Pasteboard.

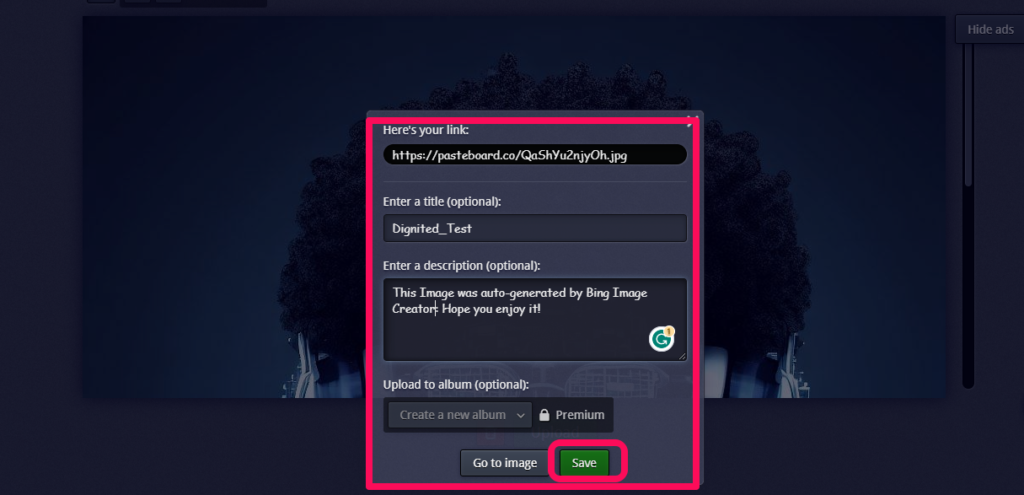
Step 5: You can add option meta-data about the image; then hit the Save button.

Step 6: Copy the link to your clipboard by highlighting the text and pressing Ctrl+C (Windows) or Cmd+C (Mac).
Step 7: Paste the link into an email, messaging app, or other platform to share it with others.
That’s it! Your image will now be uploaded to the Pasteboard platform, and you’ll be able to access it from anywhere using a shareable link.
Related: How to Share Images and Files Between Your Android Phone and Chromebook
Notes:
One thing to keep in mind when uploading images to Pasteboard is that there are some restrictions on image size and format. Currently, images must be under 10MB in size, and they must be in one of the following formats: JPEG, PNG, GIF, APNG, TIFF, or BMP.
If your image is too large or in the wrong format, you may need to resize or convert it before uploading it to Pasteboard. There are many free online tools available for resizing and converting images, so this should be a relatively easy process.
That’s all there is to it! When someone clicks on the link you’ve shared, they’ll be taken directly to your image on the Pasteboard platform.
Another thing to keep in mind when sharing Pasteboard links is that they are public by default. This means that anyone with the link can view your image, so you should be careful about sharing sensitive or personal images in this way. If you need to share a private image, you can use the Pasteboard password protection feature to add an extra layer of security.
Related: Sharing Files in Windows using Windows Explorer
Pro Tip
Now that you know how to upload images to Pasteboard and share them with others, let’s take a look at some additional tips and tricks to help you get the most out of the platform:
Tip: Organize your images into folders for easy access. With a free Pasteboard account, you can create folders and albums to keep your images organized and easy to find.
Conclusion
Sharing images online doesn’t have to be a frustrating process. With Pasteboard, you can upload, share, and organize your images quickly and easily, from anywhere in the world. By following the steps and tips outlined in this post, you’ll be able to use Pasteboard to share images with anyone, anywhere, in just a few clicks.
So why not give Pasteboard a try today? It’s free, easy to use, and could save you a lot of time and hassle in the long run.
Discover more from Dignited
Subscribe to get the latest posts sent to your email.


