Sharing files between different user accounts on Windows can be a helpful feature, especially if you have multiple users on the same computer or if you need to transfer files between other accounts.
However, many users may not know how to do this or may encounter issues when attempting to share files between different accounts. In this step-by-step guide, we will walk you through the process of sharing files between two user accounts on Windows.
Related: How to Use the Files App on a Chromebook
Step 1: Create a Shared Folder
The first step in sharing files between two user accounts is to create a shared folder that both accounts can access. To do this, follow these steps:
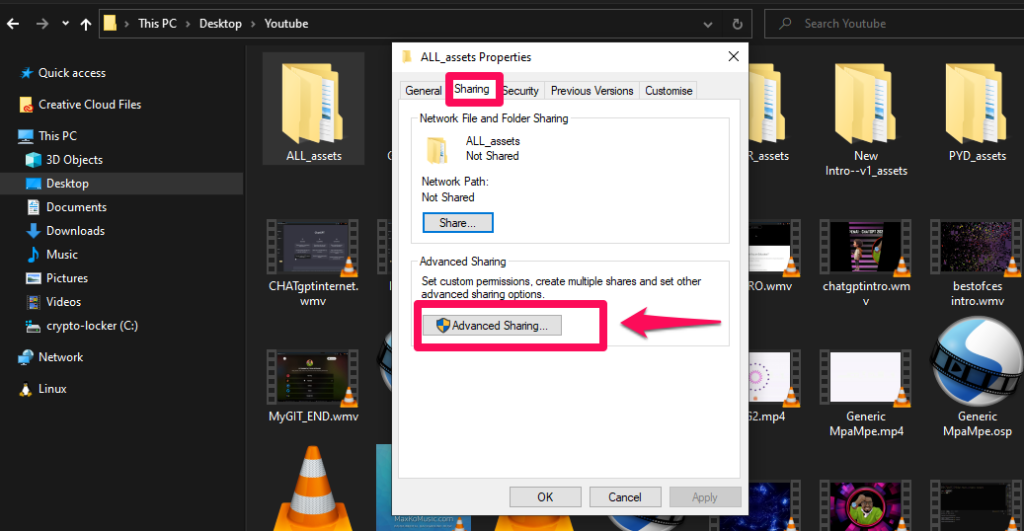
- Right-click on the folder you want to share and select “Properties”.
- In the Properties window, click on the “Sharing” tab.
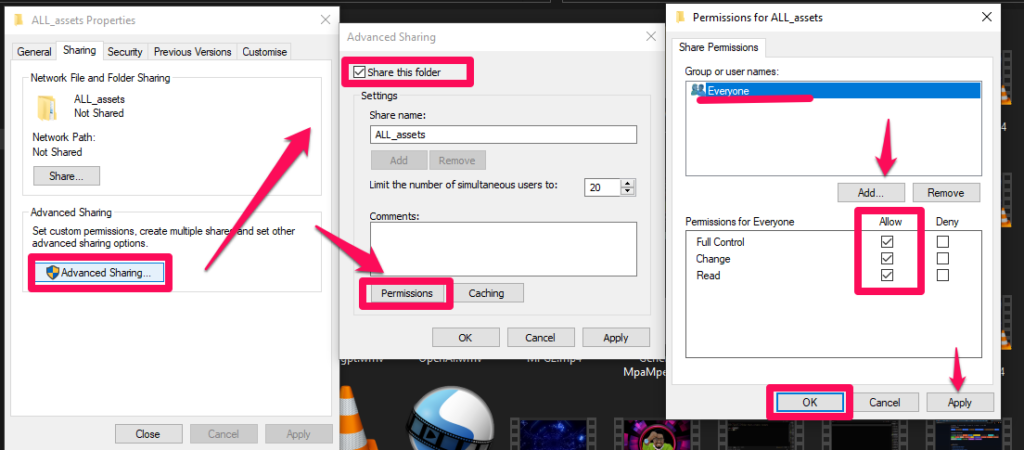
- Click on the “Advanced Sharing” button.

- Check the box next to “Share this folder”.
- Click “OK” to save the changes.

- Select Permissions
- The Allow
- Apply and OK
Related:
- How to share files with Android’s Nearby Share feature
- 5 ways you can send files from your PC to your Phone
Step 2: More on Granting Permissions to the Shared Folder
Once you have done that, you may need to grant permission to the other user accounts or domains to access the folder. To do this, follow these steps:
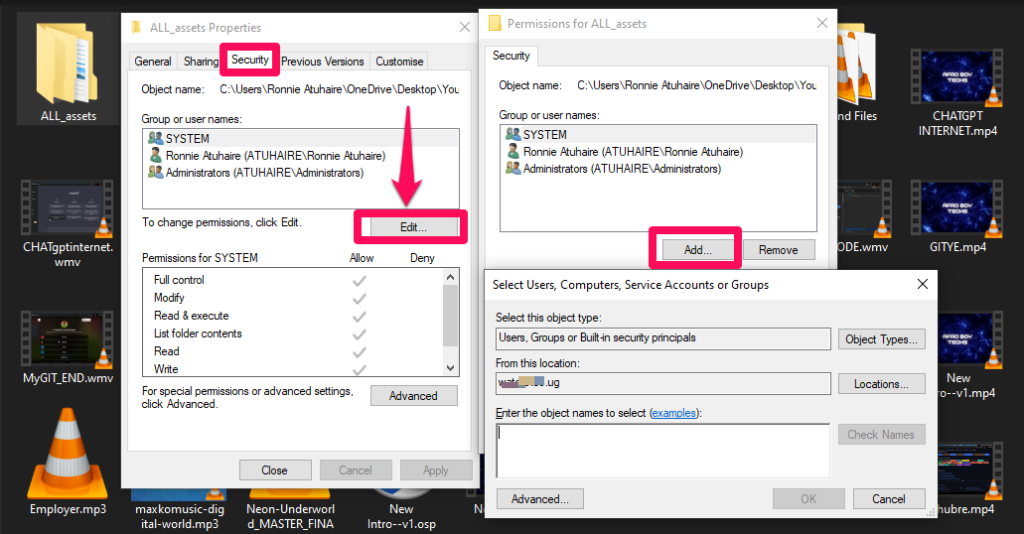
- Right-click on the shared folder and select “Properties”.
- Click on the “Security” tab.
- Click on the “Edit” button.
- Click on the “Add” button.
- Type the name of the user account you want to grant permission to and click “OK”.
- Check the box next to “Full Control” and click “OK” to save the changes.

Once you have completed these steps, the other user account should be able to access the shared folder and any files within it. Sharing files between different user accounts on Windows can be a simple and useful feature and can help you to transfer files between accounts and collaborate more effectively.
Related:
- How to use Firefox Send to share large files
- How to Send Large Files Over Email
- The easiest way to send large files online
Alternative Method: Public Folder on Windows
A public folder is a shared storage area in a computing environment that is accessible to multiple users or groups. Public folders are commonly used in email systems, file-sharing networks, and collaboration platforms to allow multiple users to access and share common resources.
Here are the steps to locate a public folder in Windows:
- Open File Explorer by pressing the Windows key + E or clicking on the File Explorer icon in the taskbar.
- In the left sidebar of File Explorer, scroll down and click on “This PC” to expand it.
- Look for a folder labeled “Users” in the list of available drives and folders. Scroll to the “Public” folder to expand it.

- The “Public” folder contains subfolders for different types of files, such as “Public Documents,” “Public Music,” “Public Pictures,” and “Public Videos.” Click on the appropriate subfolder to view its contents.

- If you cannot find the Public folder on This PC, it may be hidden. To unhide it, click on the “View” tab in File Explorer and check the box next to “Hidden items” in the “Show/hide” group.
Related: How to Share Images and Files Between Your Android Phone and Chromebook
Once you locate the Public folder, you can access and use it like any other folder in Windows. You can also modify its properties, set permissions, or share it with others on your network.
Conclusion
In this article, we have discussed two alternative ways to share or transfer files between two or more separate accounts on a Windows machine. If you have tried these methods, please share your experience in the comments section regarding whether you were able to view the shared files when switching to another account.
Discover more from Dignited
Subscribe to get the latest posts sent to your email.


