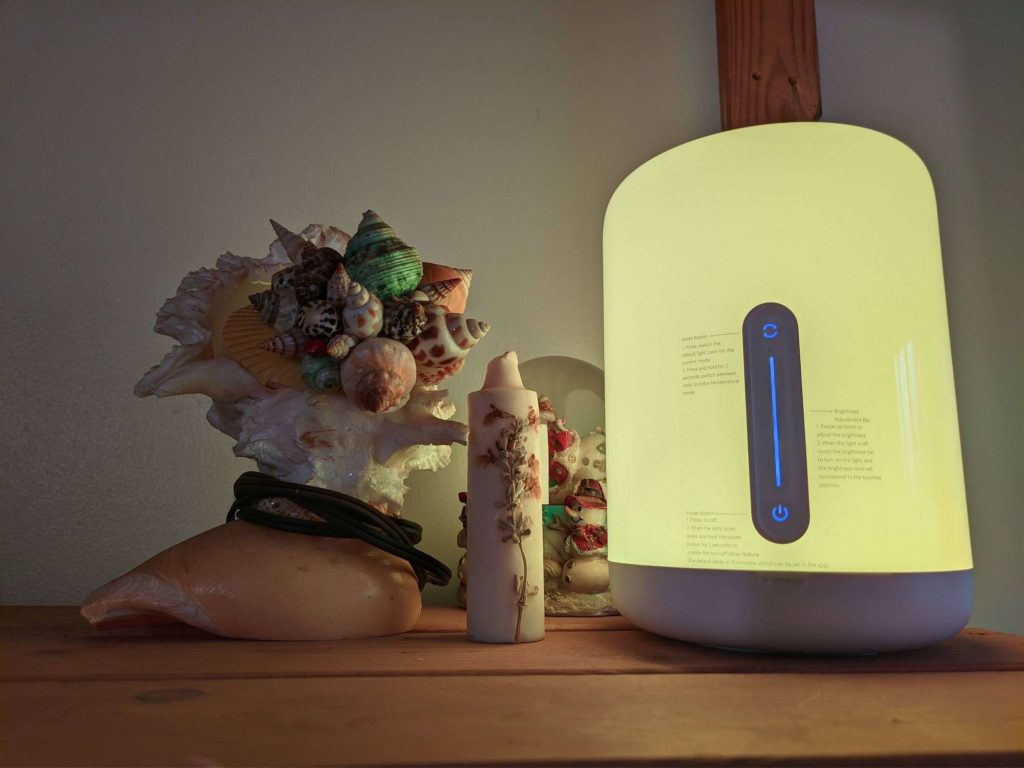
In my quest to furnish my humble place of abode, I have increasingly found myself purchasing the remarkable but nevertheless underrated Xiaomi smart devices such as the Mi Body Composition Scale 2, Yeelight Smart Led Bulb, the Xiaomi Mi Box S, Xiaomi Mi Security Camera 360 and now the Mi Bedside Lamp 2. The Mi Bedside Lamp 2 is a cylindrical smart lamp from Xiaomi that I have begrugdingly come to love since it landed on my station. This WiFi-enabled lamp boasts a diverse color gamut of 16 million colors to choose from. Color temperatures range from as low as 1700k to 6500k
We have much to say about the build quality, the design, features, and whatnot but all that will come in a later post. The Mi Bedside Lamp 2 just so happens to have not one, but two Xiaomi apps capable of exploiting its capabilities. While the Xiaomi Home app (or Mi Home App) has the more aesthetically pleasing finish, the Yeelight app is just as functional if a little bit dated. Let’s take you through how to set up the Mi Bedside Lamp 2 with either app.
Setting up Mi Bedside Lamp 2 with Xiaomi Home (Mi Home) App

- Turn on Bluetooth and Location
- Sign in to the Xiaomi Home app
- Give app authorization to use location
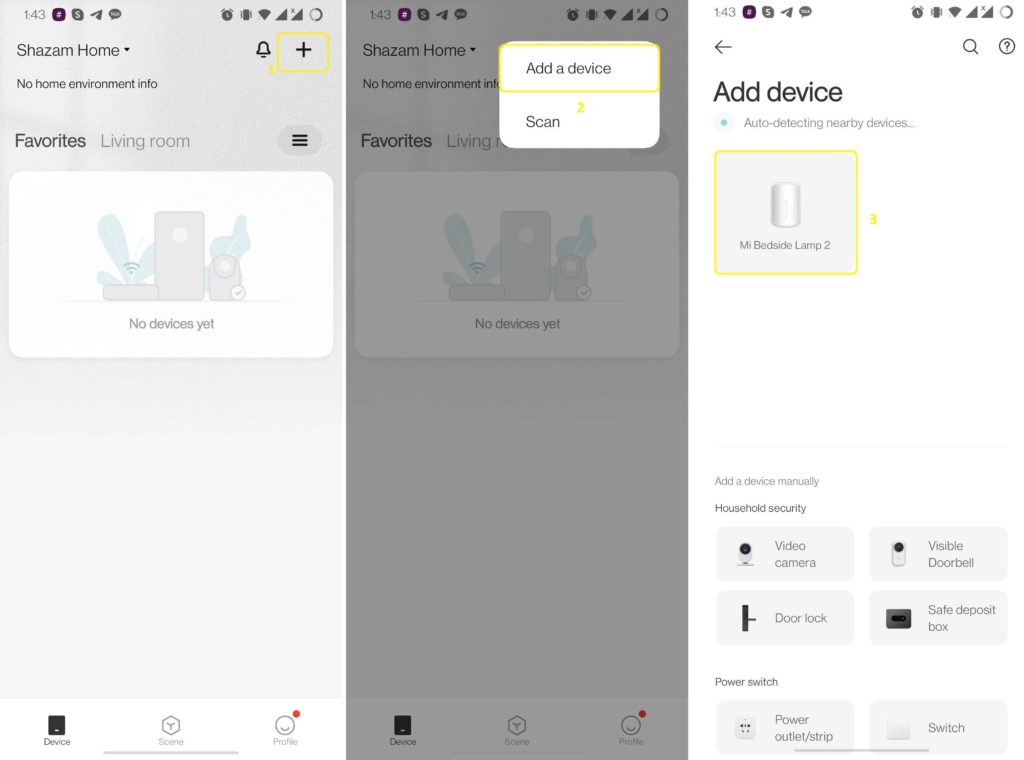
- Tap on the (+) sign on the top right to ‘Add a device’.
- The app should auto-detect nearby devices and discover the Mi Bedside Lamp 2. Tap on it.
- Select WiFi network to connect to.
- The Xiaomi app will upload the Mi Bedside Lamp 2 information
- Choose which room to place it in.
- Set lamp name
- Add to Favorites (or skip this step)
- Invite your family members to use it together. You can also skip this step.
- Read through and agree to the User Agreement and Privacy Policy.
Xiaomi Smart Home basics:
- Mi Body Composition Scale 2
- Yeelight Smart Led Bulb
- Mi 360 Home security camera 2K Pro features
- Xiaomi Mi Box S Review: Android TV on any TV
Setting up Mi Bedside Lamp 2 with Yeelight App

- Turn on Bluetooth and Location
- Start the Yeelight app
- Tap on ‘Experience Now’ to get started.
- Select Server (Leave the recommended server)
- Sign into Yeelight with a Mi Account.
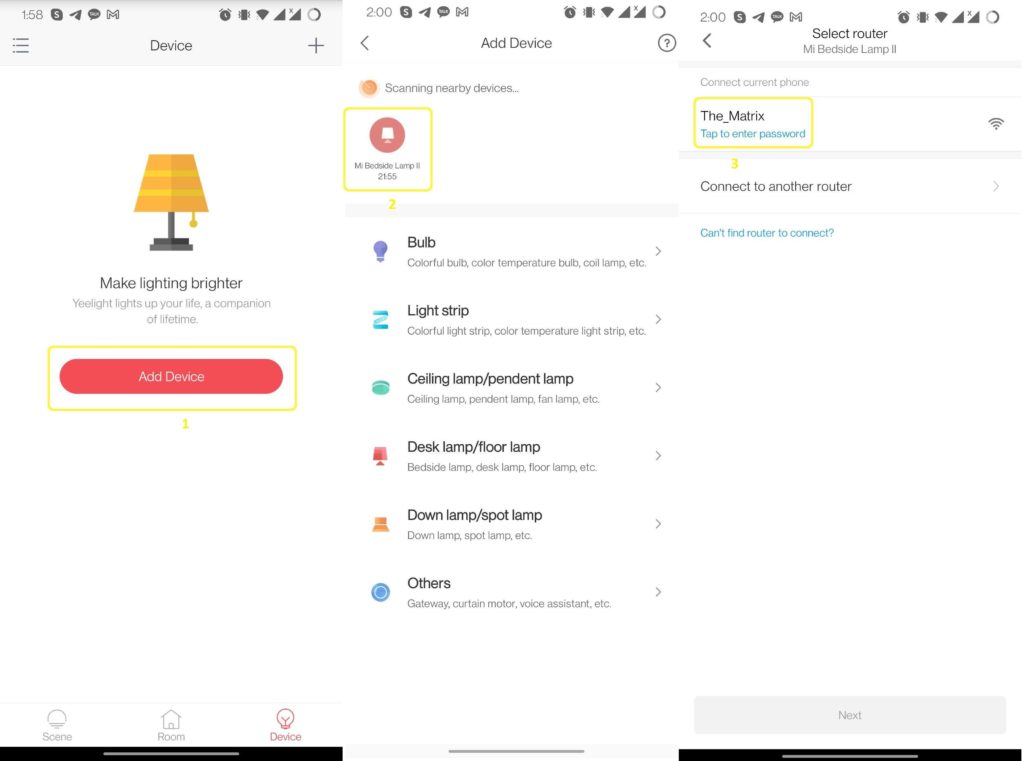
- Tap on “Add Device” or…
- Tap on (+) symbol in the top right corner and select ‘Add Device’ if you already have other Yeelight devices added.
- Give Yeelight app location permission in order to discover nearby devices.
- Scanning nearby devices will commence. Once discovered, tap on Mi Bedside Lamp II
- Connect to a network (router)
- Wait for updating connection status
- Rename device. The default name is Mi Bedside Lamp 2.
- Choose a room, or leave it unchecked. Press done.
Here’s a video on how you can setup the Mi Bedside Lamp 2 using the Mi Home App and Google Home App.
Which one to use?
Personally, I use both the Yeelight App and also the Xiaomi Mi Home app. Incidentally, they don’t both support the same devices. For instance, my Yeelight smart LED bulb can’t be recognized on the Xiaomi Mi Home app. The Yeelight app is easy to overlook given how it looks. But the thing is, it just works. It’s not pretty, but it gets the job done and that’s all we want at the end of the day.
When it comes to the Mi Bedside Lamp 2, I noticed that the Yeelight app has an ace up its sleeve. It has a color picker. I don’t know why but I get excited snapping different colors to see how well the lamp will reproduce them. It’s a nifty feature you won’t find in the more refined Xiaomi Home app for some reason.
Why I love the Xiaomi Home app is that it’s just gorgeous. The icons are pleasing to the eye and the app navigation is smooth as butter. The Xiaomi Home App is where all the other cool features reside. You can activate automation, set more mode button options, create light groups, and more features than I care to get into.
What you choose to use is ultimately down to preference and ease of use. The Yeelight app is lighter, occupying only 64.84MB on my smartphone. The Xiaomi Home app for its part hogs 383MB. Personally, I don’t care either way, but if you are conscious about your storage space,
Discover more from Dignited
Subscribe to get the latest posts sent to your email.


