We’ve all accidentally deleted an important file at some point, whether it be a work project, a school assignment, or personal photos. What if we can’t get it back? Fortunately, there is a way to recover accidentally deleted files using Recuva, a free and open-source file recovery tool for Windows.
In this article, we will show you how to recover accidentally deleted important files using Recuva in Windows.
What is Recuva?
Recuva is a free and open-source file recovery tool that can be used to recover deleted files from various storage devices, including hard drives, USB drives, memory cards, emails, and more. Recuva is only available for the Windows operating system and is supported even on the latest Windows 11 platform.
It offers a range of features that make it an ideal choice for recovering accidentally deleted files. What’s even better is that Recuva is available in both free and paid versions, with the free version providing ample features for most users. The paid version is about 25$ for a 1-year premium subscription.
Installing and Setting Up Recuva
To begin the recovery process, you need to download and install Recuva on your Windows computer. You can find the official download on the CCleaner website. Once downloaded, run the installation file and follow the on-screen instructions.
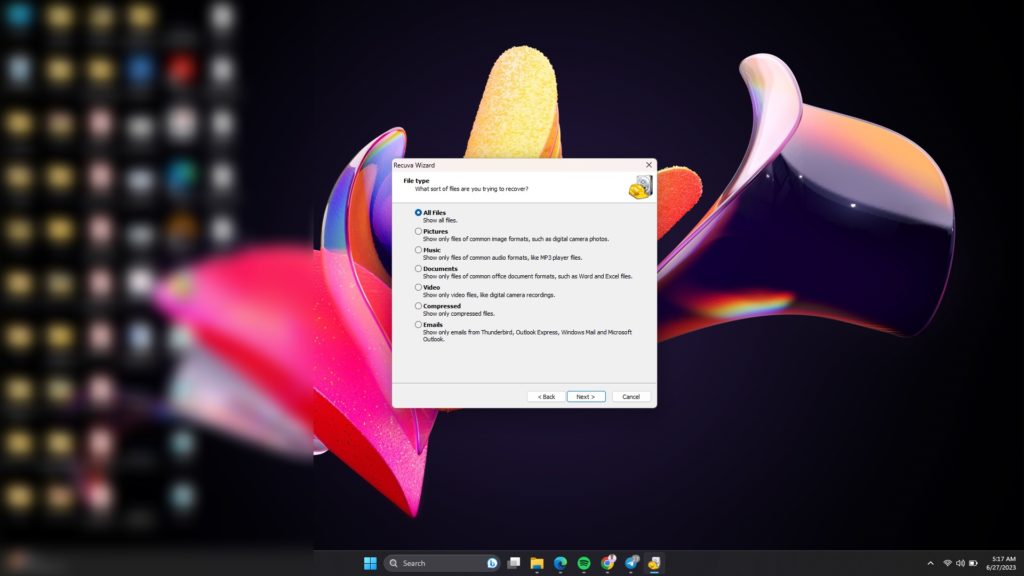
Once installed, you’ll be presented with a wizard interface that allows you to select the drive you want to scan for deleted files. If you have specific file formats in mind, such as documents, music, emails, images, or videos, you can choose them here.

READ ALSO: How to Recover Deleted Files in Windows 10
Using Recuva to Recover Deleted Files
Once you have installed Recuva, you can start recovering deleted files. To do this, follow these steps:
- Launch Recuva.
- Select the type of files you want to recover. Available options include All Files, Pictures, Music, Documents, Video, Compressed, and Emails.
- Select the file location or drive where the deleted files were located. Select the drive or specific location where the files were originally stored. If you’re unsure, it’s recommended to scan the entire drive for a comprehensive search. choose the “I’m not sure” option to scan all file formats ever deleted on your PC.
- Click “Start”.
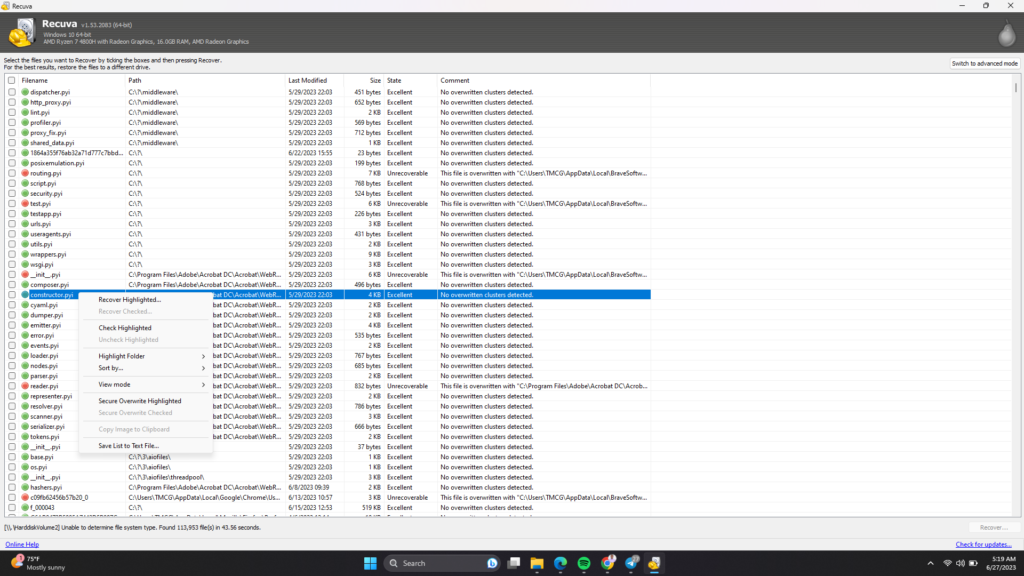
To recover your deleted files, you’ll need to select the drive where the files were stored and enable Deep Scan to thoroughly search for deleted files. Once you’ve started the scan, Recuva will show you a list of deleted files that can be recovered. Simply select the files you want to recover, right-click and choose “Recover Highlighted” to Recover your deleted files. Choose a new drive location to save the recovered files.
Keep in mind, you can highlight and select multiple files at once when recovering deleted files using Recuva.

Here are some tips for recovering deleted files:
- Don’t write anything to the drive where the deleted files were located. This could overwrite the deleted files and make them impossible to recover.
- If you have recently deleted the files, you may be able to recover them from the Recycle Bin.
- If you have not recently deleted the files, you may need to use a deep scan to recover them.
To increase your chances of recovering your deleted files, it’s essential to stop using the drive immediately after realizing the files are missing. The sooner you use Recuva, the better your chances of recovering your files. It’s also important to recover the files to a different file location/drive to prevent overwriting the deleted data.
Accidentally deleting important files can be a frustrating experience, but with Recuva, you can recover your lost files quickly and easily. By following these simple steps and tips, you can increase your chances of recovering your deleted files and minimize the risk of losing them permanently. Share with us in the comment section if you have ever used Recuva and your experience.


